 Did we miss anything in this location? Is there something we didn't discover? Let us know!
Background
You leave Touristville behind and make your way into the Barrens proper, exiting civilization as you know it. With each step, the little order that still exists falls away, taken over by anarchy in its purest form. All semblance of government oversight, corporate domination, even media influence disappears, leaving an urban-feral landscape of bleak desperation.
Did we miss anything in this location? Is there something we didn't discover? Let us know!
Background
You leave Touristville behind and make your way into the Barrens proper, exiting civilization as you know it. With each step, the little order that still exists falls away, taken over by anarchy in its purest form. All semblance of government oversight, corporate domination, even media influence disappears, leaving an urban-feral landscape of bleak desperation.
Yet hidden in this wreckage of a suburb, Renraku Computer Systems has hidden some sort of R&D research lab -- probably to take advantage of some old tech left after the Shiawase nuclear powerplant meltdown or the crash that decimated the computer industry in '29.
You find your way into the lab. The place has definitely seen better days. No security systems are online to greet you -- just the ones made of meat. Maybe you can help a scientist make a life-change.
Karma Points
- [6-8] Decide what to do with Saada (#8).
Walkthrough
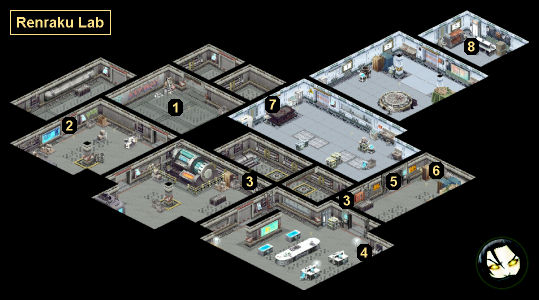
This is a straightforward combat mission. You'll start out in combat mode (#1), and you'll have to fight your way through several Lonestar security agents as you make your way through the front part of the complex. Then when you reach the main lab (#4), you'll encounter a Corporate Mage, three more security agents, and -- close by -- their test subjects, aka basilisks. No matter what you say to the mage, you'll have to fight him.
The security agents in the main lab will start out in overwatch mode, so don't rush too far into the room. In fact, you might have an easier time if you retreat back into the room with the terminal (#3), and lure the agents to you. You can also hack a turret (#6, #7) and let it even the odds a bit. Just be wary of the basilisks. Their gaze will remove all of your AP for a turn. At the end of the battle, you'll exit combat mode.
In the back of the complex, you'll meet Saada (#8). You'll have three choices for what to do with him:
- You can simply let Saada go. You won't get paid by anybody, but you'll earn 8 karma points when you return to Mr. Johnson.
- You can charge Saada for letting him go. He'll pay you 5000 nuyen, and you'll still earn 8 karma points when you return to Mr. Johnson.
- You can complete the mission as intended. When you return to Mr. Johnson, you'll earn 9000 nuyen and 6 karma points.
When you make your decision, you'll automatically return to
The Union mission, just as you left it. That's how you'll be able to report back to Mr. Johnson.
1 - Starting Point
2 - Ambush
Two guards will rush through this doorway and try to surprise you from behind.
3 - Drone Access Ports
4 - Terminal
You'll find research logs on this computer. If you have Decking 6, then you'll be able to download Renraku Research Data. This will earn you 1500 nuyen when you return to Mr. Johnson (provided you mention it before talking about Saada).
5 - Main Lab
6 - Turret Control
If you jack into the matrix here, then you'll be able to take control of the turret in the next room (#7), and use it against your enemies.
7 - Turret
8 - Saada


