|
|
Side Quest: Far from Home
 Did we miss anything in this section? Is there something we didn't discover?
Let us know!
Background
Did we miss anything in this section? Is there something we didn't discover?
Let us know!
Background
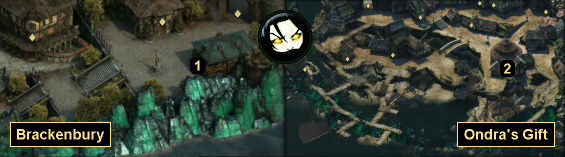
You'll receive this quest from Thristwn inside the Charred Barrel in
Brackenbury (#1).
Walkthrough
Thristwn will tell you that he and a courtesan named Serel work together to steal gold and jewelry from unsuspecting nobles -- only recently Serel got ahold of an Engwithan medallion sacred to his clan, and she won't sell it to him for any sort of price that he can afford. He'll then ask you to talk to Serel for him.
Serel works at the Salty Mast in
Ondra's Gift (#2). When you go inside, you'll meet Maea, and you'll learn that a night with Serel costs 1000 cp. To lower that price to 500 cp, you can complete Maea's quest
Supply and Demand. The only way to remove the price entirely is to head upstairs and kill Serel's bodyguards, but this will limit what you can say to Serel afterwards (you'll only be able to intimidate her, and she'll only give you the medallion if you have at least Might 14).
When you talk to Serel, she won't sound too upset about Thristwn's plight, but you'll have a few ways that you can deal with her:
- With Resolve 16 and Resolve 18, you can convince Serel to give you the
Stolen Engwithan Medallion. You'll receive a "moderate" reputation bonus with Defiance Bay for choosing this option.
- With Might 16, you can grab Serel. Then with Dexterity 14 you can prevent her from calling for her bodyguards. Otherwise you'll have to fight them. Either way you'll end up with the medallion, but you'll lose a "minor" amount of reputation with Defiance Bay.
- You can offer to buy the medallion. Serel will demand 6000 cp for it. With Intellect 18 you can reduce this price to 4000 cp. If you buy the medallion, then Serel will also give you
Serel's Ring, and you'll earn a "slight" reputation bonus with Defiance Bay. If you choose the Resolve 19 dialogue option and lie to Serel about fencing the medallion, then you'll get the medallion for free but you'll lose a "slight" amount of reputation with Defiance Bay. After lying to Serel, if you return to her and give her 6000 cp for the medallion, then she'll give you
Serel's Ring.
- You can kill Serel and her bodyguards (by force-attacking them). Serel will drop the medallion plus
Serel's Ring and 2000 cp when she dies, but you'll lose a "minor" amount of reputation with Defiance Bay for each of the three deaths.
- You can agree with Serel that Thristwn doesn't deserve the medallion. When you return to Thristwn to tell him this, he won't be thrilled by your change of heart. With Resolve 17 or Might 16 you can end the conversation peaceably. Otherwise you'll have to fight Thristwn, and you'll find a
Cloak of Many Feathers on his corpse. Then when you return to Serel, no matter what you say to her, she'll give you
Serel's Ring. If you killed Thristwn, then you'll also lose a "moderate" amount of reputation with Twin Elms. Otherwise, you'll only lose a "minor" amount of reputation with Twin Elms.
If you acquired the medallion from Serel, then when you return with it to Thristwn, you'll have some options for how to complete the quest:
- You can give him the medallion. He'll reward you with 2000 cp, and you'll get three ways to respond:
- You can simply take the money. This will earn you a "minor" reputation bonus with Twin Elms.
- You can let him keep his money. This will earn you a "moderate" reputation bonus with Twin Elms.
- You can demand a better reward. Thristwn will add in a
Cloak of Many Feathers, but you'll only earn a "slight" reputation bonus with Twin Elms.
- With Resolve 19, you can lie to Thristwn and tell him that Serel sold the medallion. Thristwn won't give you a reward, and you won't earn a reputation bonus.
- You can tell Thristwn that you're keeping the medallion. This won't make Thristwn happy, and you'll lose a "moderate" amount of reputation with Twin Elms. If you respond with the Might 16 dialogue option, then Thristwn will threaten you but leave peaceably. Otherwise he'll attack you, and you'll find a
Cloak of Many Feathers on his corpse.
1 - The Charred Barrel
2 - The Salty Mast
|
|
|


