 Did we miss anything on this map? Is there something we didn't discover? Let us know!
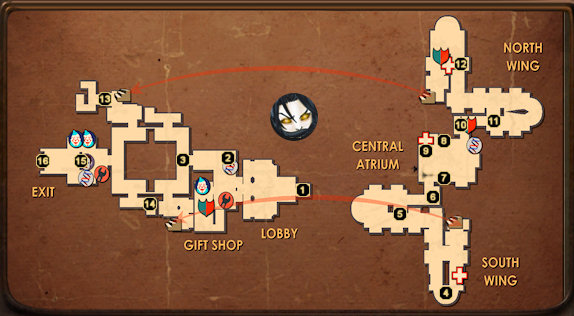
1 - Arrival
Did we miss anything on this map? Is there something we didn't discover? Let us know!
1 - Arrival
Your goal here in the Proving Grounds is clear. You need to escort the Little Sister under your protection through this final level so that you can finally get your hands on Frank Fontaine and make him pay for messing with your head and attempting to take your life on multiple occasions.
In the event that the Little Sister you're protecting dies, you'll have to hammer at a "Hidey-Hole" to get another.
2 - Vita-Chamber
Not only will this Vita-Chamber resurrect your blasted corpse, but it will apparentely equip you with another Big Daddy suit and spray three samples of Big Daddy Pheromone on you before spitting you back out. Truly a wondrous machine!
3 - Museum Battle
Once the Little Sister gets you through this first door, take a peek over the balcony and watch as a Big Daddy finishes off a Splicer. As she dies, the Splicer fires several machine gun rounds at the ceiling, which severs the wires holding up the skeletal remains of a gigantic dinosaur-like fish creature. The bones crash down on top of the Big Daddy and it stops moving.
4 - Test Subject #1
Your little escort will stop here for a moment to extract some Adam from the "Test Subject #1" corpse. While she's busy, you need to defend her from three waves of Splicers. Hack the security camera above you in order to recruit some security bots to your aid when the craziness begins. When all six Splicers are dead, the Little Sister will continue escorting you down the west hall.
5 - Test Subject #2
The Little Sister can't resist the temptation of extracting some more Adam, so you'll need to prepare for a couple more waves of Splicer attacks here. Hack the security camera to the south and the flame turret to the west for some extra help. In the event that your Little Sister should die, there's a "Hidey-Hole" directly to the east that you can bang on to get another one.
6 - Machine Gun Turret
You'll have to hack or destroy this turret before your Little Sister can open the door to the north.
7 - Machine Gun Turret
As you move around the skeletal remains that dropped from above, this wall will open up and a machine gun turret will open fire on your Little Sister. Put a stop to it.
8 - RPG Turret
This turret's rocket-propelled grenades won't be able to strike the Little Sister until she gets close to the north wall, so you have a little time to disable it or remove it from existence.
9 - Vita-Chamber
Another one of Rapture's resuscitative wonders.
10 - Security Camera
Hack this security camera, you'll need it.
11 - Splicer Ambush
As you move through this area, Splicers will rise up from the water and open fire on you and the Little Sister. Crush them under your humongous Big Daddy boot. If you happen to lose your Little Sister, there's a "Hidey-Hole" right next to the security camera.
When all of the Splicers are dead, Fontaine will come across your radio to declare just how great it feels to shoot himself up with Adam (for the first time, believe it or not). "Forget all the nose candy and floor polish I've been wasting time with - this stuff is the mother's milk!" By the sounds of it, you'll be facing another superhuman like yourself. At least it should be a challenge.
12 - Test Subject #3
These Little Sisters just can't pass up an Adam-enriched corpse. There's a machine gun turret and security camera directly to the west, so make sure both of those are hacked before the orphan starts performing her work. I'd also recommend lighting up the oil to the south, as Splicers will be charging in from that direction as well.
13 - Elite Bouncer
Just as you reach the top of these stairs, a crazed Elite Bouncer will come crashing through the west wall and immediately become hostile toward you. This is a tough fight in such tight quarters, so kite it back to the security camera and turret at area #12 for a little extra firepower. With any luck, he'll worry more about the turret than you and you'll be able to unload a few crossbow bolts into his head without any resistance. Too bad you can't take his drill and add it to your own suit, eh?
It's also worth mentioning that there is a First Aid Kit, an EVE Hypo, and a Grenade Launcher in the small tunnel the Big Daddy just crashed out of.
14 - Safe
Hmmm. A massacred cat next to a falling-over safe... what could have happened here? It really doesn't matter, I guess, so just grab the eight Electric Buck and five Incendiary Bolts inside the safe and be on your way.
15 - Fontaine Battle Preparations
You'll want to make all of your final preparations in this room, as your next stop will pit you against Frank Fontaine. To start off, spend all of your remaining Adam at the Gatherer's Garden vending machine in order to pick up any character upgrades, plasmids, or tonics you haven't already purchased. Next, pay a visit to the Gene Bank and reassign your tonics and plasmids. You won't be needing any hacking bonuses, security bonuses, or anything similar. Assign only those enhancements that will give you an edge in the fight to come.
There are some EVE Hypos, First Aid Kits, and a selection of ammunition scattered around the cart to the north, so loot those and then spend any remaining cash you have at the El Ammo Bandito! and Circus of Values vending machines. And last, but certainly not least, grab the ADAM Harvesting Tool that the Little Sister is presenting to you out of the northwest vent. You cannot defeat Fontaine without this.
16 - Exit
This is it. Press the elevator button and enjoy your ride up to
Fontaine's Lair.


