 Did we miss anything in this section? Is there something we didn't discover?
Let us know!
Starting Out
Did we miss anything in this section? Is there something we didn't discover?
Let us know!
Starting Out
When you gain control of Geralt, you'll automatically jump to his character page, and you'll find that you have 59 bronze talents and 7 silver talents to spend. If you're thorough, then you'll gain a level before the end of the adventure, but otherwise the character you start with is the one you'll end with, and so you'll need to choose your bonuses carefully.
Because of how the adventure can play out, we'd recommend that you focus on your attributes and your steel sword skills when you spend your talents. It's also a good idea to put a point into the Herbalism skill and to put some points into Igni.
The Prosecution
When you start out in the adventure, you'll find yourself near a camp (#1). When you approach the camp, a cut scene will kick in introducing you to Prince Merwin Ademeyn and the sorceress Sabrina Glevissig. After the cut scene, some wolves will attack. Defeating the wolves will net you 1000 experience points.
Note: For most conversations in the adventure, you'll need to click the left mouse button to advance the dialogue.
After the battle, when you talk to Merwin and Sabrina, you'll learn that they're at Kaer Morhen because Merwin's older sister Deidre fled there. They'll claim that Deidre is afflicted with the Curse of the Black Sun, and that they need to stop her and study her before she can cause any more problems. "I'm a professional. I know what the girl needs."
Sabrina will also give you the quest "The Howling." If you bring her 20
Beast Livers (from wolves) to complete the quest, then she'll reward you with 2000 experience points and the steel sword
Harvall. If you tell Sabrina that she's "an unusual woman" when you turn in the livers, then she'll sleep with you.
Also in the camp, you'll meet some mercenaries and hangers-on, including the Cook, the Quartermaster, and Merton Bringgs, the mercenary leader. These NPCs won't really add anything to the plot, but you can use them as shopkeepers and dice poker opponents if you want to. About the only thing you'll need to buy during the adventure is alcohol for your potions.
The Defense
After talking to Merwin and Sabrina at their camp (#1), you'll need to head west and talk to three witchers and Deidre. You'll find Lambert (#6) near a ford (#7), Eskel inside a mine (#16), and Vesemir and Deidre inside Kaer Morhen (#18). Between the four, you'll learn that Eskel is tangentially involved in the situation, and that Sabrina and Merwin might be pursuing Deidre for personal reasons.
Deidre will also give you the quest "Hungry like a Wolf," where she'll ask you to bring her three slabs of
Wyvern Meat so she can feed her wolves. You'll find wyverns on the eastern side of the river (#13). If you bring the meat to Deidre then she'll reward you with 2000 experience points and a
Svarog Rune Stone. If you follow that up by asking her "Is that a question that befits a princess?" then she'll sleep with you.
Note: From what we can tell, feeding the wolves won't make them more powerful if you end up fighting them (and Deidre) at the end.
After talking to the witchers, they'll move over to a meeting place (#8) outside of Kaer Morhen. It's at this spot where you'll finally have to choose a side.
The Verdict
If you decide to let Sabrina and Merwin have Deidre...
... then you and Eskel will go to Kaer Morhen (#18) to deliver the bad news. Deidre won't take it well. She'll stab Eskel, summon five special archespores called cursed souls, and she'll disappear.
The easiest way to defeat the cursed souls is to use Igni on them. So quaff a
Swallow potion and a
Tawny Owl potion, and then start whacking and casting away. If you get into some trouble, just retreat a safe distance away until the
Swallow potion has replenished your health.
After the battle, you'll automatically summon Sabrina to help with Eskel's wounds. Sabrina will take this opportunity to request that you stop protecting Deidre. If you agree, then the adventure will end and you'll learn that Deidre terrorized the countryside for two more years before Sabrina could capture her and study her -- and learn that she wasn't really cursed. If you don't agree, then the adventure will end in the same way, except that Eskel will be the one to track down Deidre and kill her.
If you decide the shelter Deidre...
... then after relaying this decision to Deidre (who you'll find on the path to Kaer Morhen, #18), you'll also have to notify Sabrina and Merwin at their camp (#1). However, when you get there, all hell will break loose. Eskel will get wounded, the mercenaries will attack you, and Deidre will chase Sabrina into her tent.
Note: For some strange reason, the battle with the mercenaries will cause all of the campfires on the map to disappear, so if you need to spend some talents or brew some potions, you should do that first.
After defeating the mercenaries, when you enter the tent, you'll be given the opportunity to change your mind about who to support. If you stick with Deidre, then Sabrina will leave and the adventure will end, and you'll learn that Deidre and Merwin together ruled their kingdom peaceably for years to come. But if you switch to Sabrina, then you'll have to fight Deidre and her two wolves.
The battle with Deidre is the most difficult in the adventure. She and her wolves will hit you hard, and they'll hit you often enough that they'll disrupt most of your attacks. It's possible that you'll die before you can get off even one swing of your sword.
So, obviously, if you're planning to fight Deidre, you should buff up before entering the tent. A
Swallow potion won't make much of a difference because the battle will end quickly one way or the other, and a
Tawny Owl potion won't be useful either because Deidre will keep your endurance drained regardless, but you should definitely take a
Thunderbolt potion, and you should use your best weapon upgrade on your steel sword. You should also save your game outside of the tent.
When the battle starts up, immediately draw your steel sword and choose the group style. If you're lucky, you'll kill or knock something down right away, and then you'll be able to mop up the rest. The adventure will end when you kill Deidre, so if the group style doesn't work for you, you can also try going after her directly.
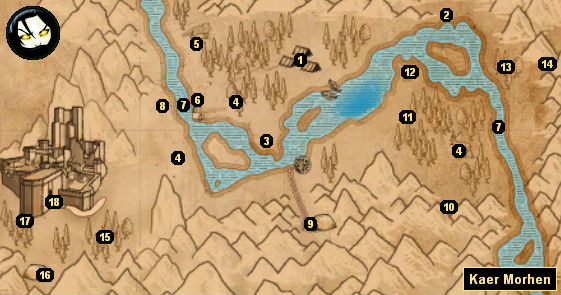
1 - Sabrina's Camp
2 - Fallen Log
A log will block your progress here. To reach the wyverns (#13), you'll need to cross the two fords in the river (#7).
3 - Circle of Elements
Clicking on this circle will temporarily improve your Aard sign.
4 - Wolves
5 - Giant Centipede
If you kill the giant centipede, then near it you'll discover a body and a skeleton, and if you examine them, then you'll find a
Cat potion, a
Gold Ring, a
Gold Diamond Ring, and more.
6 - Lambert
After talking to Lambert, two archespores will spring up and attack. Igni is useful against them.
7 - Fords
You'll only be able to cross the river at these two spots.
8 - Meeting Place
This is where the witchers (#6, #16, #18) will go after you've spoken to them.
9 - Old Mine
The mine is very small, consisting of a single chamber. You'll encounter one basilisk inside the mine and one basilisk outside the mine, and you'll get about 500 experience points for killing them. You'll also discover a body inside the mine, but you won't find anything useful on it.
10 - Archespore / Skeleton
You'll find a
Silver Ruby Ring, a
Red Ribbon, and more on the skeleton.
11 - Giant Centipedes
You'll encounter a pair of giant centipedes near here.
12 - Circle of Elements
Clicking on this circle will temporarily improve your Igni sign.
13 - Wyverns
You'll face two regular wyverns and a royal wyvern here. Try to draw them to you one at a time. You'll need the
Wyvern Meat that they drop for Deidre's quest (#18).
14 - Archespore / Skeleton
You'll find a
Torch, a
Silver Ruby Ring,
Diamond Dust and more on the skeleton.
15 - Achespores
You'll face a couple of archespores in this area.
16 - Old Mine
Outside the mine, you'll find a skeleton and a campfire. You can grab some
Diamond Dust from the skeleton.
Inside the mine you'll meet Eskel. In order to talk to him, you'll have to help him clear the mine of kikimores. The mine contains three chambers. Inside each chamber you'll encounter an unending supply of kikimore workers. To get the workers to stop spawning, you'll have to use the Aard sign to destroy their cocoons. Each time you destroy a cocoon, you'll also destroy the kikimore workers associated with it, and so you should ignore the workers completely and just take out the cocoons. Obviously, since you'll be casting Aard quite a bit during this sequence, it's a good idea to quaff a
Tawny Owl potion (and probably a
Swallow potion) before starting.
Each time you clear a chamber in the mine, one or more kikimore warriors will show up and attack you, but they shouldn't prove too difficult to defeat since you'll have Eskel helping you. In between the battles, Eskel will tell you how he is related to what's going on with Deidre (he once saved Deidre's father's life, and Deidre is his "unexpected child"), and how he doesn't really want to hand her over to Sabrina. After clearing out the mine, he'll also give you the book
The Curse of the Black Sun.
17 - Debris
If you use the Aard sign to disperse the debris here, then you'll clear the way into a small cul-de-sac containing a giant centipede and a skeleton. From the skeleton you can pick up a
Sapphire, a
Gold Ring, and more.
18 - Kaer Morhen
You'll find Vesemir and Deidre here. You'll need to talk to both of them to advance the adventure.


