 Did we miss anything? Is there something we didn't discover? Let us know!
1 - Vision
Did we miss anything? Is there something we didn't discover? Let us know!
1 - Vision
Upon entering this room, the xenomorphs will speak to you, providing a vision of their "symphony of life," and offering a chance for you to surrender. Well, I mean, if you... if you want to do that, you can... hope you like game over screens! No? Well, then, continue down the corridor.
2 - Corridor
In here, you'll be attacked by a Monkey and a Hybrid. When they're dead, check the floor to your left for an Audio Log, and some crates containing Cigarettes and some alcohol. There's also Version 1 Repair Software and the game cart for Overworld Zero, an Ultima knock-off, on one of the corpses.
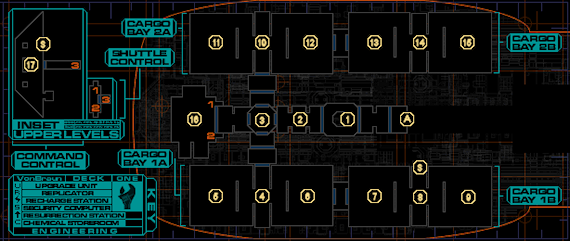
3 - Intersection
You'll find doors to all major areas of Engineering B accessible from this room - nice and simple. Be careful on entering, as there's a Security Camera waiting for you. Although you need to head to Cargo Bay 2 to find Sanger, the door requires a key (5), so make your way to Cargo Bay 1 instead, though you can take the time to explore Command Control right now if you wish.
4 - Cargo Bay 1 Entrance & Replicator
Smash the rubble to get through. Upon entering, you'll see a Replicator in front of you, and some crates. The walls are also lined with pods containing Protocol Droids, though you can ignore them. You'll find a Medkit in one of the crates near the Replicator, and the machine itself is selling Soda, Maintenance Tools, Rifled Slugs and
Strength Boosters, with a hack allowing you to buy Anti-Personnel Shotgun Shells.
5 - Cargo Bay 1A West
In this side of the Cargo Bay you'll find a bunch of Protocol Droid storage containers, but little else. Looks can be deceiving, however... sneak around to the back and you'll find a body containing the Cargo Bay 2A/2B Access Card, as well as 5 Nanites. Taking it will cause several Protocol Droids to attack you. Uh-oh. Backtrack away quickly while taking them out one by one, until they're all gone, then return to explore the upper floors.
On the second level, you'll come under attack by three Protocol Droids - back off and deal with them, but try not to fall off the edge, as the fall can be lethal if you've taken some damage. Search on top of some crates for a pack of 20 Nanites, as well as a box of Standard Bullets.
The top level contains more interesting loot. Ride the elevator up and you'll encounter some Protocol Droids and a Laser Turret. Standard procedure applies - lean in and out around a corner and take pot shots to avoid being shot at. Nestled among the crates you'll find 3 Cyber Modules and a hackable security container, with a Medical Hypo, Standard Bullets and 22 Nanites inside. Time to explore deeper in!
6 - Cargo Bay 1A East
Here, you'll come face-to-face with a
Maintenance Bot, like the one you found in MedSci. Fortunately, speed is still its problem, so just keep poking in and out of cover while dodging its projectile attacks, and it should go down. You'll notice a bunch of Protocol Droids in storage containers around the back of the room; if you go to the end of their little corridor, you'll find 5 Nanites and some AP Bullets on some crates above, but climbing up will trigger the Droids to break out of their pods, so use your Kinetic Redirection to grab them if you can.
Take the elevator on the left side of the room up to the second level to find a corpse with some Anti-Personnel Shotgun Shells and 5 Nanites. Ride the elevator to the third level, and there's another corpse with 15 Nanites and a Chips. Take the lift down and proceed to Cargo Bay 1B.
7 - Cargo Bay 1B West
There's some Monkeys hanging around in here, so best deal with them now. Climb onto the crates in the middle of the room for some Standard Bullets, and a hackable container that contains more Standard Bullets and 10 Nanites. There's also 5 Nanites on top of some crates to the right of the door leading to Cargo Bay 1B East (9).
Take the elevator up to the second level to find another Monkey. Not much here except for some Standard Bullets amongst the crates. Elevate yourself once more up to the top level. Another floor, another Moneky to kill. Search one of the corpses hidden in the darkness for 2 Cyber Modules and 10 Nanites.
8 - Audio Log & Implant
The small area between the two sides of Cargo Bay 1B has a little bit of loot in it - search the desk for 5 Nanites and an Audio Log about the Monkeys, while the corpse near the Security Control Station holds a Psi Hypo and a
SwiftBoost(TM) Implant.
9 - Carbo Bay 1B East
Another corpse with an Audio Log on your way in, again about everyone's favorite enemy, chimps. Speaking of, you'll have to slaughter a few in this area. Climb onto the crates at the back of the room for some Light Combat Armor, and there's a pack of 5 Nanites on the stack across from it. Time for more elevator action.
On the second level you'll find... yep, more Monkeys, then search the corpse for 10 Nanites, some Standard Bullets and a Pistol (on the floor next to it). Ride up once more, and on the third level you'll come across a corpse with 2 Cyber Modules and some Rifled Slugs on it, along with a Shotgun nearby. That's it for Cargo Bay 1! Not too bad loot-wise, all things considered. Backtrack to (3) and head to Cargo Bay 2 for more exploring.
10 - Cargo Bay 2 Entrance & Replicator
You'll need the Access Card from (5) to enter Cargo Bay 2. Beyond the doors, you'll likely be attacked by a Laser Turret - lean around cover to take it out without much fuss. You'll find a broken Replicator nearby, requiring a Repair skill of 3 to get working again, but if you're technically-inclined, it sells Cigarettes,
Portable Batteries, Standard Bullets and Anti-Radiation Hypos; hacking it will yield Version 1 Repair Software.
11 - Cargo Bay 2A West
Check the corpse near the Laser Turret for Version 1 Hacking Software, 8 Nanites and an Audio Log. Head around to the back of the room and you'll find another corpse hiding in the crates with some Rifled Slugs on it. Ride the lift on the north side of the room up, as the other one is broken.
On the second floor, you'll find a lone Hybrid and some Standard Bullets hidden amongst the crates. On the side with the broken elevator, you'll see a pack of 15 Nanites on a ledge - you'll need to use Kintetic Redirection to grab them. Take the other elevator up to the third floor to find another Hybrid, a corpse with 2 Cyber Modules and Chips, and a hackable security crate containing a Psi Hypo, 20 Nanites and some Juice. Finally, if you circle around to the broken elevator, you can grab 15 Nanites, but it'll collapse and likely kill you, so use your telekinesis to grab it instead, or quickly step on and off the lift, then grab the Nanites at the bottom.
12 - Cargo Bay 2A East
Kill the Hybrid lurking around back, then search the corpse for a Medical Hypo and Surgical Unit Activation Key. There isn't much on the upper two levels - some Standard Bullets on top of some crates over the south elevator, and, on the third level, a Hybrid guarding 5 Nanites on a corpse.
13 - Cargo Bay 2B West
You'll be attacked by a couple of Hybrids as you enter this area. There isn't much loot of note around here. If you call the elevator on the north side of the room, you'll be attacked by a Maintenance Bot, so avoid the temptation to press the shiny red button and use the other lift. There's nothing at all to find on level two, but on the top level, you'll find a hackable crate with some Chips, a Medical Hypo and some AP Bullets inside. You'll also find a corpse on the broken elevator with a junk Pistol and some more AP Bullets.
14 - Laser Turret & Maintenance Bot
Move cautiously through the door, as there's a Laser Turret guarding the hallway, and a Maintenance Bot just beyond it. As always when dealing with these enemies, pot shots and use of cover are your key to success. Nearby, take the time to search the desk for 5 Nanites and an Audio Log by the captain, Diego, who is beginning to show signs of being persuaded by "the Many", the name you'll come to know the xenomorphs by.
15 - Cargo Bay 2B East
There's an Audio Log on the floor in here, as well as a corpse with some Anti-Personnel Shotgun Shells. As before, if you activate the broken elevator, a "helpful" Maintenance Bot will be called in, so don't bother unless you want a fight.
On level you two you'll find a corpse with 2 Cyber Modules on it, as well as some Anti-Personnel Bullets. Ride up to the last level, and you'll come under attack by a Maintenance Bot. Use the crates for cover to take it out. You'll find the corpses of Sanger and Malone here, so grab her Audio Log to learn the code to Engineering Control back in Engineering A is 15061. Sanger also has a
French-Epstein Device, used to modify weapons, and Malone has a broken
Laser Pistol that probably isn't worth your time. Time to head back to Engineering A.
16 - Shuttle Bay & Recharging Station
As soon as you open the door, a Laser Turret will attack you. Quickly fall back and take a shot at one of the explosive barrels, which will set off a chain reaction and severely damage the Laser Turret. Head back inside and finish it off with one or two shots, and then dispose of any Hybrids that might be lurking around, and the Monkey near the cargo lift.
Check the crates at the bottom of the cargo lift for an Audio Log and some Cigarettes and booze, then ride the elevator up for a Maintenance Tool on the second level and 20 Nanites plus some Chips, Juice and alcohol in the crates. There's another Hybrid in a maintenance hatch in the floor, along with a crate containing Rifled Slugs and Anti-Personnel Bullets. Finally, use the Recharging Station in the corner of the room to get your Implants up and running. The Grav Shaft leads to Command Control (17).
17 - Command Control, Bio-Reconstruction Unit & Upgrade Stations
Upon riding up the elevators, you'll see another sad, ghostly image of a crew member. Inside Command Control itself, you'll have to fight off a couple of Hybrids, and keep an eye out for the Security Camera on the left side of the room. Each of the corpses in the room have 5 Nanites on them, and be sure to activate the Bio-Reconstruction Unit near the Security Camera. There's another two Upgrade Stations on the opposite sides of the room, dealing in Tech and Stats. Last, grab the Audio Log from the control console near the corpses.
Once you've got the computer part #45M/dEX from back in Engineering A, you can use it on the Systems Monitoring Unit. Dr. Polito will grant you 10 Cyber Modules. This will render the Fluidics Control Console and will shut down the radiation leak, finally giving you access to the Engine Core in Engineering A. Progress at last! Backtrack your way to Engineering Control and get that system up and running.
A - Transition to Engineering A
Take this door back to Engineering A once you've got the radiation leak contained.
E - Elevator
You'll be able to use this to travel around the Von Braun once you've restored power.
S - Security Control Stations
Use these to deactivate any alarms you may set off.


