Did we miss anything in this location? Is there something we didn't discover? Let us know!
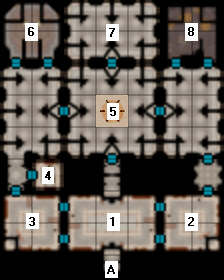
Imperial Grand Hall |
Area Note
Although you can enter the Imperial Grand Hall at any time, there isn't much point in doing so until you've received a quest to meet your father there.
1 - Imperial Captain Anagril
2 - Council Chamber
Once you're allowed to enter the chamber, stepping inside will trigger a cut scene where your father, Harkon and Overloard Vhorkas discuss a gem that was found recently, and how the gem might be a bad influence.
After the meeting breaks up, you'll finally be able to speak to your father, and he'll tell you about a meeting he's planning tonight at the Imperial Estate. He won't sound confident about the meeting, and he'll ask you to stay away from the estate just in case things go badly.
To advance the plot, you'll have to exit the Grand Hall and speak to Markius at the hall's front gates. He'll let you know that Mikel Ravenclaw was behind the assassination attempt, and he'll suggest you go and talk to the man. You can find Mikel in his room in the Ravenclaw Tavern in the Market District.
Note: If you visit the council chamber after the city comes under attack, you'll be able to open up the desk in the room. Inside you'll find a letter from Vhorkas to your father.
3 - Chancellor Varhun
For most of the game, all you'll be able to do here is talk to Chancellor Varhun and get the sense that he doesn't like you or your father very much. Later, you'll discover that Varhun more than dislikes you; he'd like to see you dead. To advance the plot, you'll have to prove this fact to Imperial Captain Anagril (#1).
From dealing with Mikel Ravenclaw at the Ravenclaw Tavern, you should either have his word or a note showing Varhun's intentions. To get Anagril to arrest Varhun, first talk to him and tell him what you've learned. Then go with him to confront Varhun, and, once you have permission, check his desk. Inside you should find
Chancellor Varhun's Letter.
With that final piece of evidence in hand, Varhun will decide to attack, but not before warning you that you'll be too late to save your father. You should receive 600 experience when Varhun dies, and you should find an
adept's staff, an
amulet of the veil, and
Varhun's Key on his corpse. As far as we can tell, the key doesn't unlock anything.
To advance the plot, you should next head to the Imperial Estate.
4 - Varhun's Quarters
5 - Chamber of the Control Stone
You won't be able to do anything here for most of the module, but after the city comes under attack, you'll need to shut down the control stone so you can make your way to the docks. Once you've arrived, you'll also discover that Harkon has been put into a magical shell, and that disabling the control stone will free him as well.
There are two ways to shut down the control stone:
A) The brute force way. For this method you'll have to destroy (bash) the 12 "control room pedestals" in the room. Markius is smart enough to help you out, so the endeavor shouldn't take very long, although you and Markius might get shocked a few times during the process.
B) The more sophisticated way. This method involves actually using the control stone, and for that you'll need to know two things: a code phrase and how to place the warding runes. If you have a high enough lore skill, then you'll remember the code phrase from previous conversations with High Sorcerer Zhiram. Otherwise, you'll have to go to the library (#6) and pick up
Ledger #13: The Control Stone from a chest there. The ledger contains the phrase. To set the runes, you'll have to read
Zhiram's Ledger, which you can find on Zhiram's corpse right next to the control stone. The ledger contains a song, which lists how the runes should be placed: the right rune at 9, the left rune at 1, and the middle rune at 0. Then you'll just need to focus your will upon the control stone to operate it.
Once the control stone has been disabled, you'll earn 1000 experience, but then the Crimson Prophet will make another appearance. He'll taunt you for a bit and then leave, but before he does, he'll summon six Crimson Followers to attack you. Since you'll have Markius and Harkon to help you, the fight shouldn't be too bad.
To advance the plot after the battle, you'll need to head for the Ravaged Market District.
Note: Before leaving the Imperial Grand Hall, you can finally loot the Imperial Treasury (#7) if you'd like.
6 - Library
7 - Imperial Treasury
You'll be able to loot the treasury near the end of the module, after you've disabled the control stone (#5). The big chest along the northern wall contains the best items (enchanted weapons and armor), but you'll have to pick the lock to get inside.
8 - Storage Room
You can grab some low-level treasures here, plus a couple of rations.
Exits:
A. Door back to the Imperial District.


