 Did we miss anything on this map? Is there something we didn't discover? Let us know!
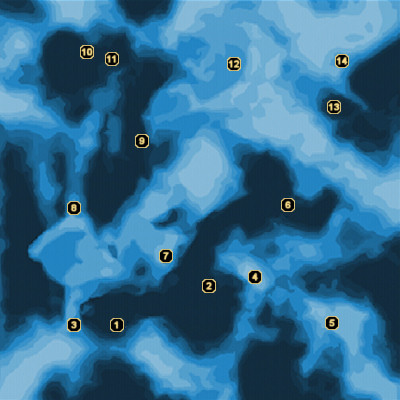
Asteroid X57 is located in the Asgard system of the Exodus cluster. The Asgard system is only available if you've purchased the "Bring Down the Sky" downloadable content.
1 - Arrival
Did we miss anything on this map? Is there something we didn't discover? Let us know!
Asteroid X57 is located in the Asgard system of the Exodus cluster. The Asgard system is only available if you've purchased the "Bring Down the Sky" downloadable content.
1 - Arrival
If you aren't familiar with the "Bring Down the Sky" DLC, then you should know that Batarian extremists have hijacked this mobile asteroid station and are sending it crashing into the nearby colonized planet of Terra Nova. According to Normandy's status report, the asteroid will collide with the planet in four hours.
As the Normandy approaches Asteroid X57, a distress call comes across your radio from a human female currently in hiding from the Batarians. The woman quickly explains that you must shut down the three fusion torches being used to propel the asteroid, which triggers the "X57: Bring Down the Sky" assignment. Given the amount of time you have, you'd better get started.
2 - Fusion Torch #1
This is the first of three fusion torches that you must disable in order to keep Asteroid X57 from crashing into Terra Nova. A half dozen Heavy Turrets guard its perimeter, so use the Mako's weaponry as needed to eliminate the defenses. The four turrets stationed closest to the fusion torch are capable of raising a defensive barricade if you move out of range, which means you won't be picking these turrets off from a safe distance as you may have done elsewhere in the galaxy. Once the turrets have been destroyed, you're free to enter the lower level of the building.
The layout of these control facilities is very similar to what you've probably seen on other uncharted worlds, so it shouldn't take long to get your bearings. Moving into the ground floor's main chamber, you'll be greeted by a couple of Batarians and their trained Varren. A battle will immediately begin, pitting you against several Batarian Troopers, four Batarian War Beasts, and a single Batarian Sniper. If you have any trouble with them, a well-placed shot at the fuel tank along the back wall will help turn the tide in your favor. When they've all been taken down, you'll find that you've unlocked a new
Technology: Translation codex entry and are now free to loot the grenade storage box and storage locker in the back room.
The upper floor is devoid of any Batarians, so help yourself to the contents of the secured crate there before disabling the torch using the southwest console. As expected, disabling the torch requires a successful completion of the game's XYBA minigame. Once it's down, the female who initiated the distress call earlier will come across the comm system to introduce herself as an engineer named Kate Bowman. Before she can say much else, the Batarians try entering the room where she's hidden and you'll be forced to end the conversation.
As you go to leave the facility, you'll run into a human male. After fearfully taking a shot at you with his pistol, he'll apologize and introduce himself as Simon Atwell, the asteroid's chief engineer. He'll then go on to explain just how dire the situation really is. Asteroid X57 is 22 kilometers long, which means the impending collision will be equal to thousands of fusion bombs exploding at once. To put it simply - doom and gloom for every plant, animal, and human that exists on Terra Nova.
Simon will also fill you in on the Batarian numbers, their leader (who the Batarians only refer to as "Balak"), Kate Bowman and her brother Aaron, three missing engineers (which triggers the triggers the "X57: Three Missing Engineers" assignment), and the fact that one of the torch facilities is surrounded by live blasting caps and proximity detectors. Fun, huh? That last bit of information will actually trigger yet another assignment, appropriately called "X57: Avoid the Blasting Caps". When you've heard everything you need to know (and gained any applicable Paragon or Renegade points, based on your answers), exit the building and jump back into the Mako.
3 - Survey Station 3
A closer inspection of G. Mendel's corpse reveals that the person was killed execution-style by their "sadistic" captors. It's pretty obvious that this is the first of three engineers you've been asked to find as part of Simon Atwell's "X57: Three Missing Engineers" assignment.
Before moving on, loot the technician kit by the nearby transmitter and then head inside the small building. Use the aid station if you need any medi-gel, then turn your attention to the station log terminal to discover a report filed by Mendel claiming that the central transmission tower is "on the fritz" again. Apparently nobody ever listened to the engineer's warnings about the station having single points of failure.
4 - X57 Radio
It seems the more savvy engineers here on Asteroid X57 have been running a small pirate "rock" station. Check out the humorous promotional messages within the console's logs, then fire up the radio controls if you'd like to listen to a few tunes. There's also an aid station here, just in case you need it.
5 - Survey Station 1
You'll stumble upon a second engineer corpse in this small building, which leaves only one more to find as part of the "X57: Three Missing Engineers" assignment. Upon closer examination of C. Hymes' corpse, it appears that the engineer was killed by some sort of explosion. Her final log file will confirm that the explosive was attached to the building's door by the Batarians.
6 - Fusion Torch #2
This second fusion control facility is the one Simon mentioned - its entire perimeter is dotted with blasting caps. After destroying the three Heavy Turrets with the Mako's cannon, you'll have to proceed on foot up to the building itself. Along the way, a "proximity detection" indicator will let you know if you're getting close to setting off one of the blasting caps. A single blast will instantly kill you and your entire squad, so heed this warning. To make matters worse, two Batarian Troopers and two Batarian Rocket Soldiers will emerge from the facility as you approach it.
When the welcoming party has been dealt with, use the blasting cap controls near the building's entrance (it's a standard XYBA minigame) to disarm the landmines littering the perimeter. You can now pull the Mako up closer if you want or simply head inside to disable yet another fusion torch.
This time, you'll be up against a Batarian Engineer, five Batarian Troopers, and a total of six Rocket Drones. Use the elevated cover (a new feature to Mass Effect?) to demonstrate your combat prowess most effectively and the group of terrorists shouldn't last too long. When they've been cleaned up, search the crate and storage locker on the ground floor before heading upstairs to loot another secure crate and a medical kit.
Continue on to the second floor's control room and disable the second fusion torch, prompting another conversation with Kate Bownman. After telling you that Balak intends to blow up the whole station, she gets caught by the Batarian leader and his henchmen. A short cutscene demonstrates his brutality as he executes her brother Aaron when she refuses to acknowledge the identity of the one shutting down the torches (you). You now have another motivating factor - revenge.
7 - Transmission Tower
Repairing this transmission tower restores the data link to several of the asteroid's survey stations. This will place annotations on your in-game map at areas #3, #5, and #10.
8 - Vehicle Wreckage
Atop this hill, you'll discover the body of T. Slajs (who Simon may have mentioned earlier). By the looks of it, he managed to escape his burning vehicle only to be slain by the Batarians. Grab the contents of the technician kit next to him and be on your way.
9 - Fusion Torch #3
Six more defense-enabled Heavy Turrets surround the third torch facility, so approach with caution. There are no blasting caps this time around, though, so at least you don't have to worry about losing any limbs to shrapnel. When you arrive inside the facility, you'll find it patrolled by by five Batarian Troopers, four Batarian War Beasts, and one Batarian Shock Trooper. Slay them all, then ransack the grenade storage box and storage locker on the ground floor, as well as the secure crate on the second floor.
Disabling the third torch is uneventful, though you'll run into some more Batarians when you reach the ground floor. The one named Charn will strike up a conversation with you and claim that he originally signed up for "a quick slave grab." Crashing an extinction-causing asteroid into a heavily colonized planet apparently wasn't on the agenda. You're free to attack him at any time, but you can also try some persuasion. A successful Charm ("Forget Balak.") or Intimidate ("Don't be stupid.") line will convince Charn that it's in his best interests to leave the asteroid. Either way, you'll end up with a pass key to the asteroid's main facility (area #10) and some Paragon or Renegade points.
10 - Survey Station 2
There are no corpses at this survey station. Instead, you'll discover some footprints leading off to the east. A quick check of the logs will reveal that chief surveyor R. Montoya left the station to investigate some heavy arms fire over the horizon, but not before arming the local defense drones. Perceiving you as an intruder, the three defense drones will begin attacking your squad.
When the drones have been destroyed, use the aid station (if you need it) and loot the hardened crate before continuing your search for Montoya elsewhere.
11 - Body of R. Montoya
Montoya didn't make it very far, thanks to the sharpshooting of a Batarian Sniper. Apparently nobody's taken the equipment in his service pack, so Commander Shepard snatches it up. If this is the third engineer you've found, then you can report news of their deaths to Simon inside the main facility (area #11) for some extra experience and a handful of omni-gel.
12 - Asteroid X57 Main Facility
You may have disabled all three fusion torches, but you still need to save Kate Bowman and deal with Balak. The main base is guarded by six defense-enabled Heavy Turrets, three of which move along an elevated track (thus making them harder to hit). With the defenses taken out and Charn's pass key in hand, you can proceed into the
Asteroid X57 Main Facility.
13 - Construction Site
Other than an aid station, the only item of importance at this construction site is a particular footnote buried in the station's logs: "Explosives moved to grid reference 32-4-16 for safety." Reading this triggers the location of an explosives cache on your map (area #12).
14 - Explosives Cache
You can plunder the contents of eight Grenade Storage Boxes from this explosives cache.


