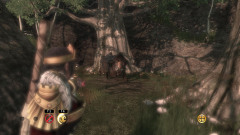
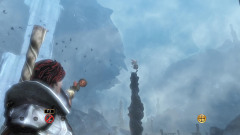
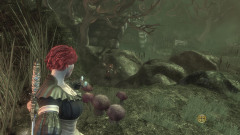
, you will begin Fable III's longest and most tedious quest. Finding the Evil Gnomes for Brian scattered all across Albion is quite a challenge and is sure to test one's patience far more than one's ability. Thankfully, we've got all 50 Evil Gnome locations for you, along with screenshots in case you're having trouble finding them.
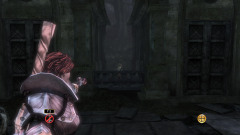
A few recommendations: the Evil Gnomes aren't too hard to find if you know where to look, and can be most easily located by listening for audio cues. They have very distinctive voices and throw insults at you whenever you're near, so use those to track them down. You can only use guns to smash them, and you'll usually have to manually aim at them in order to actually hit them properly. Finally, Evil Gnomes are almost always suspended on walls, objects and are rarely hard to spot, but are still usually outside your regular field of view.
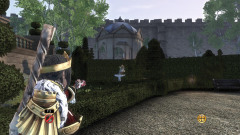 |
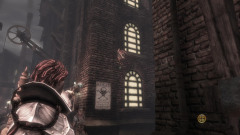
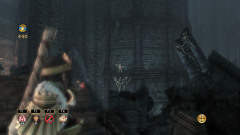
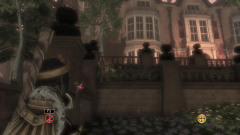
Bowerstone Castle 1/3
You'll only be able to grab this Evil Gnome after becoming King or Queen. Make your way into the courtyard and to the entrance to The Catacombs, then turn around and look to the right - the little jerk is perched on a bird bath.
|
 |
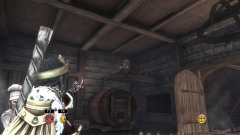 |
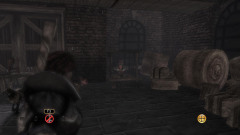
Bowerstone Castle 2/3
This second Evil Gnome can be found inside the kitchen. Take the door on the left when you first step out into the courtyard at the rear of Bowerstone Castle, then check on the shelf above the large keg in the corner of the room.
|
|
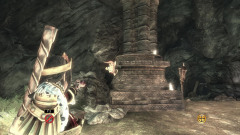 |
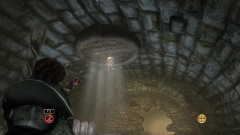
Bowerstone Castle 3/3 (The Catacombs)
From the entrance of the Catacombs, run down through the hidden door to the lower area, and once you enter out into the cavern, turn around. You'll see the Evil Gnome perched near the left-hand pillar.
|
|
 |
Bowerstone Industrial 1/5
This easy-to-find Evil Gnome is located in a small alcove just under the bridge near the exit to Bowerstone Market. You can take him out from either side of the canal, though it's a bit quicker from the opposite side.
|
|
 |
Bowerstone Industrial 2/5
Another fairly easy one. This Evil Gnome is at the other end of Bowerstone Industrial, near the docks, on the opposite side of the sewer entrance from Mourningwood. Find the foul-mouthed lawn ornament inside the alleyway, just past the bridge.
|
|
 |
Bowerstone Industrial 3/5
You'll only be able to find this Evil Gnome during or after the Animal Liberation quest. Inside the factory where you rescue the chickens, you'll find the lawn ornament in a cage underneath the catwalk you jump down from.
|
|
 |
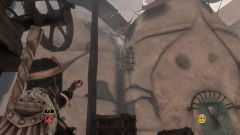
Bowerstone Industrial 4/5 (The Cesspools)
You can find this Evil Gnome during the Kidnapped quest, otherwise you'll have to backtrack to The Cesspools. You'll find the entrance to The Cesspools in a house across from the Bowerstone Shelter. After diving into the sewers and making your way through the first set of tunnels, you'll come across another. Continue straight forward towards the light shining down, and you'll find the Evil Gnome against the rear wall.
|
|
 |
Bowerstone Industrial 5/5 (The Sewers)
Make your way to the secondary Sewer entrance underneath the large crane outside Reaver's Factory. Take the left path as you enter, fighting Hobbes and Mercenaries along the way, and eventually you'll come to a hole in the wall. Step through and you'll see this Evil Gnome clearly visible in the light, hanging from a sewer grate.
|
|
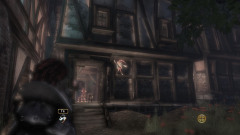 |
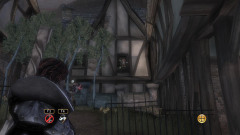
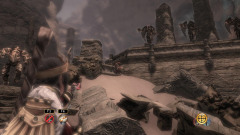
Bowerstone Market 1/3
This one can be found in the backyard of The Doghouse, a home near the exit to Bowerstone Castle, though you'll likely hear it from inside The Cock in the Crown tavern. To reach the Evil Gnome, either buy the home or break in, then head to the backyard, checking the house's rear wall.
|
|
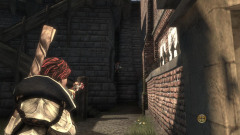 |
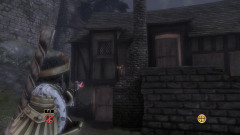
Bowerstone Market 2/3
You'll find this pesky Evil Gnome hiding out in an alcove next to the stairs leading to the battlements around the Market, right nearby the Flower Bower vendor stall.
|
|
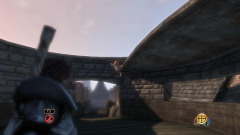 |
Bowerstone Market 3/3
You might hear this Evil Gnome from the residential area coming into the Market, but he's actually in one of the towers overlooking the front gate. Climb up the stairs on the east or west side of the walls and you'll find him easily enough.
|
|
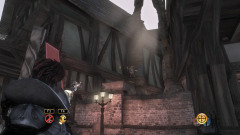 |
Bowerstone Old Quarter 1/2
You'll find this Evil Gnome on the side of a house near the centre of the Old Quarter and the gate leading out to the ocean. Snipe him from the street.
|
|
 |
Bowerstone Old Quarter 2/2
This foolish Evil Gnome taunts people in plain sight. Head up the street to the park in the Old Quarter and you'll hear him throwing insults from a wall, just above a small garden between two houses.
|
|
 |
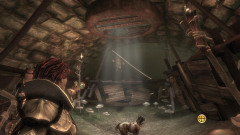
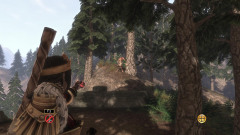
Brightwall Village 1/5
This Evil Gnome can be found once you've taken up Brian's cause. Head up to his house and blast the little bugger from his perch.
|
|
 |
Brightwall Village 2/5
From the market square, follow the bridge across and head down the left-hand street between the houses. The little menace can be found next to a chimney on one of the houses.
|
|
 |
Brightwall Village 3/5
From the market square, cross the bridge and turn right, following the road under the next bride. Take another right through the stone fence, and you'll find this Evil Gnome standing atop a boulder in front of you.
|
|
 |
Brightwall Village 4/5 (The Reliquary)
Follow the path down beyond the raising platforms you puzzled your way through during the start of the game, then head down the stairs to the small balcony. You'll find this Evil Gnome tucked away behind a pillar on the right side of the balcony.
|
|
 |
Brightwall Village 5/5 (The Reliquary)
Follow the path down beyond the raising platforms you puzzled your way through during the start of the game, then head down the stairs to the small balcony, vault down, and dive into the lake ahead. Proceed forward down the path, past some enemies, and you'll see this Evil Gnome hanging from a wall just above some piles of rubble.
|
|
 |
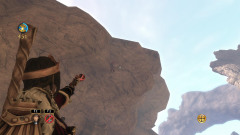
City of Aurora 1/2
This first Evil Gnome can be found by heading down to the docks. The lawn-goblin is stuck between two houses - look for The Dunes house if you're having trouble finding him.
|
|
 |
City of Aurora 2/2
This Evil Gnome can be found by heading down the path from the Demon Door, then turning left at the bottom. He's up there on the far side of the arch, incidentally, just above a Rare Book on the shrine. If you're having trouble finding it, the arch in question is right near the Wanderer's Retreat house.
|
|
 |
Driftwood 1/2
This Evil Gnome is located on the farthest island in Driftwood. Swim around the two large ones and you'll find him sitting on top of one of the rocks. If you've done the quest A New World, you'll find a shipwreck at this island.
|
|
 |
Driftwood 2/2
The second Driftwood Gnome can be found by following the shore to the left, where you'll find a small pathway into the trees and the lawn ornament sitting in a small caravan of his own. Aww, how cute.
|
|
 |
Dweller Camp 1/1
The lone Evil Gnome in the Dweller Camp is resting on the railing of the winding path leading up to the high point of the Camp. From fast-traveling there, turn right and work your way up the path a little ways to snipe him.
|
|
 |
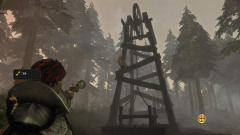
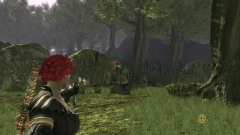
Mercenary Camp 1/1
Return to the Mercenary Camp after defeating Saker to find this Evil Gnome balancing on top of a small water tower, just past the second gate.
|
|
 |
Millfields 1/5
This Evil Gnome can be spotted fairly easily. Run up the path to the lake from the Millfields Monorail Station, and you'll find him waiting on a rock to the right side of the road.
|
|
 |
Millfields 2/5
You'll find this Evil Gnome hanging from a ledge in the garden of Reaver's Manor. Run to the very end of the path upon coming in, sticking to the lowest level, and you'll find him with no trouble.
|
|
 |
Millfields 3/5
This easy-to-spot Evil Gnome can be found near the bridge to the small island in the centre of the lake. From the bridge, look for some ruins; the Gnome is in one of the archways.
|
|
 |
Millfields 4/5 (Dankwater Cavern)
To reach Dankwater Cavern, head up the path from the Millfields Monorail Station and find the spyglass statue overlooking the lake, then search along the hillside. Inside the Cavern, head straight forward until you spy two waterfalls - the Evil Gnome is standing on a ledge next to them.
|
|
 |
Millfields 5/5 (Dankwater Cavern)
To reach Dankwater Cavern, head up the path from the Millfields Monorail Station and find the spyglass statue overlooking the lake, then search along the hillside. After passing by the waterfalls in the large cavern area, you'll likely encounter some Hobbes. Search around the back of this room and you'll find the Evil Gnome hanging between two stalagmites.
|
|
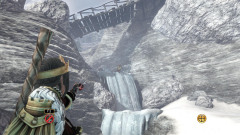 |
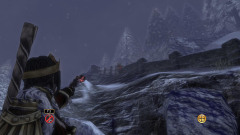
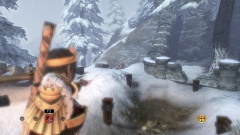
Mistpeak Valley 1/7
You'll find this first Evil Gnome atop the frozen waterfall near the Demon Door. To reach it, head up from the lake and follow the path leading under a wooden bridge into the mountains.
|
|
 |
Mistpeak Valley 2/7
Outside the Mistpeak Monorail Station, take the path leading up to an overlook nearby (you can see Brightwall in the distance from it). The Gnome is sitting on a mound of earth to the right.
|
|
 |
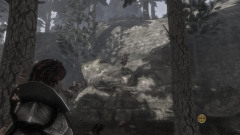
Mistpeak Valley 3/7
You'll find this Evil Gnome near an archaeological site. From the large clearing that splits into three paths (there's some ruins in the area; the path to Brightwall is on the left), take the middle path up the mountain, then cross two bridges and take the left path when you reach the next crossroads. The Evil Gnome is fairly easy to spot once you're there.
|
|
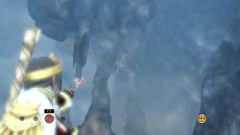 |
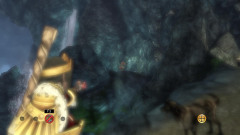
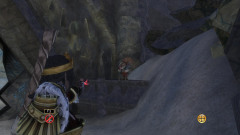
Mistpeak Valley 4/7 (Chillbreath Caverns)
From the lake, take the left-hand path up, then turn right and follow the road across the bridge overlooking the Demon Door. Enter Chillbreath Caverns and you'll immediately see this Evil Gnome hanging from the ceiling between two stalactites.
|
|
 |
Mistpeak Valley 5/7 (Chillbreath Caverns)
To find this Evil Gnome, make sure you enter the caverns nearest the Mistpeak Monorail Station. Inside Chillbreath, the Gnome is waiting atop a rock spire in the middle of a frozen pond - take the right when you come across a fork in the path to find it.
|
|
 |
Mistpeak Valley 6/7 (The Hole)
This Evil Gnome is easy to find - he's suspended on a lamppost behind the crashed monorail when you first take the elevator down into the cave.
|
|
 |
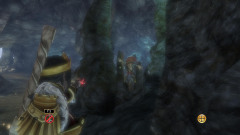
Mistpeak Valley 7/7 (The Hole)
When you reach the Hobbe arena, this Evil Gnome can be found on the rear wall as you enter - look up and to the left just a little. If you haven't finished the arena fight yet, you'll probably want to hold off on the gnome until after you're done.
|
|
 |
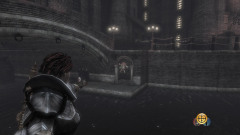
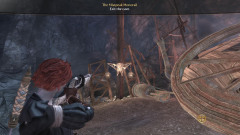
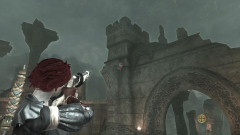
Mourningwood 1/3
Past the Mourningwood Fort, you'll find yourself in a large cemetery with a statue in the middle. This Evil Gnome can be found by taking a right, up the hill, upon entering it from the Fort's direction. He's on the backside of an arch overlooking the cemetery.
|
|
 |
Mourningwood 2/3
Near the sewer entrance to Bowerstone Industrial, there's an Evil Gnome on a rock to the left. Very hard to miss this one, as you'll likely hear him almost as soon as you enter or leave the sewer.
|
|
 |
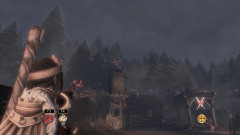
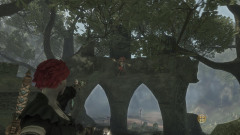
Mourningwood 3/3 (The Ossuary)
This final Evil Gnome can be found during or after the Gone But Not Forgotten side-quest. From the entrance of the Ossuary, climb up the stairs and run across the balcony and bridge, then jump down to the other side. Run forward towards past the large tree and you'll see a dead-end walkway with some crypts lining it; the Evil Gnome is spending his time stuck between two of them, opposite the lamppost.
|
|
 |
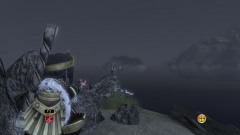
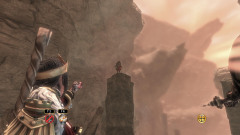
Shifting Sands 1/4
This first Evil Gnome is clearly visible immediately upon exiting from the City of Aurora. He's hanging from a pillar right in front of you.
|
|
 |
Shifting Sands 2/4
You'll likely encounter this Evil Gnome on your way to the Sandfall Palace during The Desert Star. If not, then from the steps to the City of Aurora, turn right and head down the pass with the red banners suspended above it. You'll see the Evil Gnome on the canyon wall a short distance from the Sandfall Palace entrance.
|
|
 |
Shifting Sands 3/4
On your way towards the stone arch in the desert, you'll likely come across this Evil Gnome hanging from one of the canyon walls. Clear out the Sand Furies that attack and feed him some lead.
|
|
 |
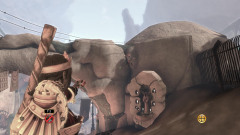
Shifting Sands 4/4 (Sandfall Palace)
The final Shifting Sands Evil Gnome is inside the Sandfall Palace. Make your way to the second large room, with the shallow water and gear-like statues protruding from the floor, and you'll encounter the Gnome on the upper-right wall. Either shoot him from the balcony up the stairway, or underneath.
|
|
 |
Silverpines 1/2
This hard-to-miss Evil Gnome can be spotted spouting his insults from next to the mine entrance in Silverpines Village.
|
|
 |
Silverpines 2/2
To reach this Evil Gnome, you'll need to follow the road out of Silverpines village and make your way to the elevator above the mine (it's a big tower). Just head in its direction and you'll eventually find your way there. The Evil Gnome is running his mouth from the side of the tower.
|
|
 |
Sunset House 1/1
This Evil Gnome can be found easily by simply climbing up the hill towards the Sunset House's ruins, and then turning to the right once you get to the top. The Gnome is resting on a nearby rock, just waiting for you to blow him to pieces.
|
|
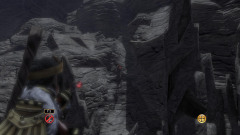 |
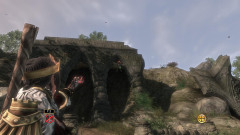
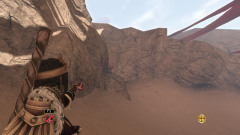
The Veiled Path 1/4
This first Evil Gnome is immediately on your right, hanging from the canyon wall above.
|
|
 |
The Veiled Path 2/4
You'll see this second Evil Gnome hanging out above a pile of rubble, at the foot of some stairs on your way up the Path.
|
|
 |
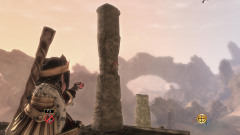
The Veiled Path 3/4
Knock this Evil Gnome off his perch; he's sitting on top of a pillar further up the trail and very hard to miss.
|
|
 |
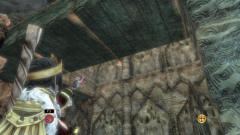
The Veiled Path 4/4 (The Enigma)
Within the ruins of The Enigma, make your way to the third room, past the one where you need to light torches to proceed. Kill off the Dark Minions that attack you, and you'll find this Evil Gnome inside one of the doors that opens during the battle.
|


