 Did we miss anything in this section? Is there something we didn't discover?
Let us know!
Walkthrough
Did we miss anything in this section? Is there something we didn't discover?
Let us know!
Walkthrough
After the disastrous battle at
Ostagar, you'll wake up in a hut. Morrigan will greet you, and she'll inform you that you and Alistair were rescued by her mother. She'll also tell you that Teyrn Loghain betrayed the king.
Note: You'll find a locked chest in the hut, but you won't be able to get into it until later.
When you exit the hut and talk with Morrigan's mother, you'll learn that her name is Flemeth -- and that she's probably the same Flemeth who has sparked many a legend in the Wilds. Flemeth will encourage you to continue to act like Grey Wardens, and to seek allies, and she'll send Morrigan along with you to act as a guide.
You'll only have one place to go after leaving Flemeth's hut -- the small village of Lothering, located to the north. If you're not playing a Human Noble, and if you completed the quest "The Mabari Hound" in
Ostagar, then along the way you'll encounter a mabari war hound, and you'll be attacked by a group of darkspawn. After the battle, the hound will become available as a companion.
Note: If you refuse to take the hound with you, then Alistair will strongly disapprove.
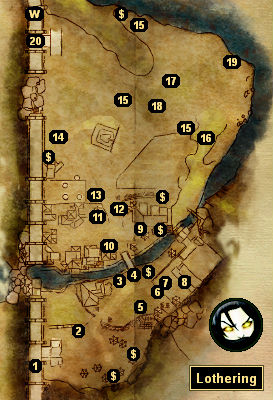
Lothering is an optional village, but in it you'll meet a few quest givers (#6, 9, 10, 11, 13), a pair of companions (#9, 13), and a pair of shopkeepers (#5, 9), so it's a good idea to explore it thoroughly and do what you can while you're there.
When you leave Lothering (via Exit W), you'll automatically set up a camp that will function as your base for the campaign. At any time while you're on the world map, you'll be able to choose the camp as your destination, and then use it to talk to your companions, purchase or enchant equipment, heal your injuries, or just rest after a trying day of adventuring.
Note: If you have the Warden's Keep DLC, then the first time you visit your party camp after leaving Lothering, you'll meet Levi Dryden there, and he'll show you the way to
Soldier's Peak, where the keep is located.
At this point in the campaign, you'll need to recruit some allies to help you against the darkspawn, and you'll have quests to meet with the Dalish elves, the dwarves of Orzammar, the humans of Redcliffe, and the Circle Mages. You can pursue these allies in any order you like, but we'd recommend starting with the Circle Mages.
1 - Toll Collectors / Dead Templar
You'll encounter a group of "toll collectors" here. They'll demand 10 silvers to allow you to pass. If you talk to them a bit, then you'll learn that Teyrn Loghain is claiming that Grey Wardens killed the king, and that the teyrn has placed a bounty on your head.
There are three ways to deal with the bandits. You can pay the toll, but this will end up costing you 30 silvers. If you're persuasive, then you can convince the bandits to pay you 20 silvers instead. You can also attack the bandits, and then either finish them off or allow them to flee. If you choose this latter approach, then you'll be able to collect all of the money the bandits stole -- 1 sovereign and 50 silvers.
Regardless, when you meet the bandits you'll trigger the quest "Bandits on the Road." There are two ways to complete the quest. If you kill or drive off the bandits, then when you report your deed to Ser Bryant in the chantry (#8), he'll reward you with 20 silvers. If you leave the bandits alone, then you can simply report their presence to Ser Bryant, and he'll send some templars to deal with them, which will net you 150 xp.
Note: As far as we can tell, the templars won't actually do anything about the bandits, and so you can report their presence to Ser Bryant and then return to them and kill them.
You'll also stumble across a dead templar here. When you loot the corpse, you'll find a
Knight's Locket and a
Knight's Note, and picking them up will trigger the quest "A Fallen Templar." To complete the quest, you'll need to report what you found to Ser Donall in the chantry (#8). If you ask Ser Donall for a reward, then you'll receive 1 sovereign and 125 xp. If you don't ask for a reward, then you'll only receive 100 xp.
2 - Farmer
The farmer will introduce you to Lothering.
3 - Robbed Family
You'll meet a family of elves here, and they'll tell you that they were robbed by the bandits at the entrance to the village (#1). If you killed or drove off the bandits, then the family will be thrilled to hear it, and they'll leave to look for their belongings. You can also give the family 50 silvers or simply ignore them. There don't appear to be any ramifications with this encounter.
4 - Lost Boy
At the base of the bridge here you'll meet a little boy who will tell you that he has become separated from his mother. It won't make any difference what you say to the boy. Eventually you'll receive a quest from the chantry board (#6) to look for his mother.
5 - Merchant
When you approach the merchant, you'll find him in a heated discussion with a group of villagers, and you'll learn that the merchant has been taking advantage of the recent troubles in the area to charge exorbitant prices. You'll then have three options for how to proceed. You can drive off the villagers in return for 1 sovereign from the merchant, you can work out a compromise between the merchant and the villagers, or you can force the merchant to leave the village. If you're feeling bloodthirsty, then it's also possible to kill the merchant.
If you work with the merchant, then Morrigan will approve but Alistair won't. If you help the villagers, then Leliana will approve. If you pickpocket the merchant, then you'll gain an
Imperium Crossbow.
6 - Chanter's Board
You'll receive three quests from the chanter's board. You won't be able to accept the second two quests until you've completed the first one. The quests are described below:
- "Weed out the Bandits." For this quest you'll need to defeat three groups of bandits in the farmlands to the north (#15). Each group will have a handful of bandits, and the northernmost one will also have the bandit leader, making it the most difficult. When you defeat the bandits and return to Chanter Devons at the chanter's board, you'll receive 3 sovereigns and 150 xp.
- "A Last Keepsake." For this quest you'll need to find the body of the lost boy's (#4) mother. When you reach it (#18), you'll be attacked by about a dozen wolves, and you'll need to defeat them. On the remains of the mother you'll find
Sarha's Keepsake. When you deliver it to Chanter Devons by the chanter's board, you'll receive 50 silvers and 150 xp.
- "When Bears Attack." For this quest you'll need to kill a trio of black bears (#19). The battle should not be very difficult, and when you return to Chanter Devons at the chanter's board, you'll receive 1 sovereign and 150 xp.
After completing all three quests, Chanter Devons will reward you with the enchantable sword
Oathkeeper and 250 xp.
7 - Doomsayer
You'll find a doomsayer here, with a crowd of onlookers watching him. If you're understanding, then you can convince the doomsayer to leave. If you're threatening, then you can drive him off. Afterwards, the crowd will ask you what they should do. If you're persuasive, then you can give them hope. If you're greedy, then you can demand that they give you their valuables, and you'll receive 45 silvers.
8 - Chantry
You'll meet four people of importance inside the chantry:
- Ser Bryant. He's in charge of the templars in Lothering. If you tell him that you're a Grey Warden and ask him for help, then he'll give you the key to the cabinet in the back of the chantry, where you'll find four
Health Poultices and perhaps
Ancient Elven Boots (depending on the version of the game you're playing). You'll also need to report to Ser Bryant for the quest "Bandits on the Road" (see #1).
- Ser Donall. He's a knight in the service of Arl Eamon of Redcliffe. He'll tell you that he's searching for the sacred ashes of Andraste, with the hope that they might be used as a cure for the arl's illness. Ser Donall will also mention that he's traveling with a fellow knight named Ser Henric, which will allow you to complete the quest "A Fallen Templar" (see #1).
- Patter Gritch. He's involved in the quest
Scraping the Barrel. You'll only be able to interact with him if you're on the quest.
- Revered Mother. She's in charge of the chantry. The first time you approach her, she'll ask you for a donation. If you give the Revered Mother some money, then you'll be able to ask her for a blessing in return (although, as far as we can tell, the blessing won't do anything for you). Also, the more money you give the Revered Mother, the more Leliana will approve. The Revered Mother is also involved in the quest "The Qunari Prisoner" (see #13).
You can also gain several codex entries while you're in the chantry:
The Maker (from listening to the chanters),
The First Blight: Chapter 1 (from a book near Ser Bryant),
The Sacred Ashes of Andraste (from talking to Ser Donall),
Adventures of the Black Fox (from a book on the floor), and
The Imperial Chantry (from a book near the Revered Mother).
9 - Dane's Refuge
Outside of the tavern, you'll meet a "helpful refugee." He'll warn you that there are soldiers inside the tavern, and that they've been drinking. Then when you enter the tavern, the soldiers will recognize you, and they'll decide to collect on the bounty that Teyrn Loghain placed on you. However, a bard named Leliana will step in to defend you, and so you'll have some help in the battle. Afterwards, Leliana will offer to join your party.
Once the dust has settled, you'll meet three people of importance inside the tavern:
- Barlin. He's a merchant, and he'll sell you a variety of things, including a
Thorn of the Dead Gods. If someone in your party is skilled in trap-making (such as Leliana), then Barlin will also give you the quest "A Poisonous Proposition," where he'll ask you to make him some poison for the traps at his farm. To complete the quest, you'll need to craft three flasks of
Venom. This will require three samples of
Toxin Extract (dropped by the giant spiders at #16) and three
Flasks (sold by Barlin). When you give the
Venom to Barlin, he'll reward you with 75 silvers and 100 xp.
- Blackstone Liaison. The liaison is from the Blackstone Irregulars, a "mercenary company that fell on hard times after the war with Orlais." The liaison will ask you to help the Irregulars by completing a series of quests. If you decide to join the Irregulars, then you'll find your first quests,
Scraping the Barrel and
Dereliction of Duty, in the box next to the liaison.
For just talking to the liaison, you'll receive the Quest-Related codex entry for
Letter from the Blackstone Irregulars. If you accept the quest Scraping the Barrel, then you'll also receive the Quest-Related codex entry for
Blackstone Letter of Conscription.
- Danal. He's the innkeeper. He'll tell you over a dozen rumors, including that Arl Eamon is ill, that the dwarven king is dead, that werewolves are roaming the forests, and that the undead are rising.
10 - Allison
If you have a character in your party who is skilled at trap-making, then Allison will give you the quest "Traps Are a Girl's Best Friend." Allison will tell you that she needs traps to protect her farm just like Barlin (#9) has to protect his, and she'll ask you to make her three
Spring Traps. If you don't happen to have any
Spring Traps on you, then you'll have to craft them using
Trap Triggers (available from Barlin at #9). When you return to Allison with the traps, she'll reward you with 50 silvers and 100 xp.
Note: As of version 1.01, you can repeat this transaction as many times as you'd like.
If you get caught pickpocketing in Lothering, then Allison will stop talking to you.
11 - Elder Miriam
If you have a character in your party who is skilled in herbalism (like Morrigan), then Elder Miriam will give you the quest "More Than Just Plants." She'll ask you to create three
Lesser Health Poultices for the refugees in the village. If you don't have enough poultices already, then you'll need to craft some using
Elfroot (found all over Lothering) and
Flasks (sold by Barlin at #9). When you give the poultices to Miriam, she'll reward you with 50 silvers and 100 xp.
If you get caught pickpocketing in Lothering, then Elder Miriam will stop talking to you.
12 - Chasind
When you approach the chasind here, you'll witness a farmer accusing them of thievery. The farmer will then leave, and nothing will come of the encounter, but you will receive the Culture and History codex entry for
The Chasind.
13 - Sten
In the cage here, you'll meet a qunari prisoner named Sten. You'll learn that Sten is accused of butchering an entire farmhold -- children and all -- and that he has been left in the cage to starve or be taken by the darkspawn. Sten won't claim to be innocent, but you'll still decide that he might be useful to you, and this will trigger the quest "The Qunari Prisoner."
There are two ways to free Sten. You can pick the lock on his cage, or you can convince the Revered Mother (#8) to give you the key. For the latter approach, if Leliana is with you, then the mother will trust your motivations, and she'll hand over the key without prompting. Otherwise, her stance on the subject will depend on how much money you donated to the chantry when you first met her. If you end up threatening the mother, then Alistair will strongly disapprove, but Morrigan will enjoy it. "Now we threaten priests? How fun!"
When Sten exits his cage, you'll receive 250 xp, and Sten will become available as a companion.
14 - Refugee Ambush
About a dozen refugees will ambush you here, in the hope of collecting the bounty on your head. They'll be lightly armored, so they shouldn't pose much of a problem. The refugees won't drop anything when they die.
15 - Bandits
If you're working on the chantry quest "Weed out the Bandits" (#6), then at each of these three spots you'll encounter a group of bandits. At the northernmost spot the group will include the bandit leader, who will drop a
Greatsword, a
Qunari Thickened Cap,
Heavy Chainmail Gloves,
Heavy Chainmail Boots, and
Heavy Chainmail when he dies.
16 - Giant Spiders
You'll encounter a group of giant spiders here. Each spider will drop some
Toxin Extract when it dies.
17 - Landmark Tree
If you select your mabari war hound and click on the tree here, then your hound will gain a bonus while it is in the area. You'll also receive the Creatures codex entry for
Mabari Dominance.
18 - Sarha's Corpse
You'll only find the corpse here if you're working on the chantry quest "A Last Keepsake" (#6).
19 - Bears
You'll only encounter the bears here if you're working on the chantry quest "When Bears Attack" (#6). Fighting the bears will also give you the Creatures codex entry for
Bear.
20 - Darkspawn / Dwarves / Blood Mage Corpse
When you approach the exit from the area (W), you'll be attacked by a few darkspawn, including a hurlock alpha. After the battle, you'll meet a pair of dwarves, Bodahn and Sandal Feddic. No matter what you say to them, they'll end up following you when you leave Lothering, and you'll always find them in your party camp. If you demand a reward from Bodahn for saving him from the darkspawn, then you'll be able to get 100-200 silvers from him.
You'll also find a blood mage corpse at this spot. If you loot the letter from the corpse, then you'll receive the Quest-Related codex entry for
Maleficarum Regrets.
Exits:
- World exit.


