 Did we miss anything in this section? Is there something we didn't discover?
Let us know!
Walkthrough
Did we miss anything in this section? Is there something we didn't discover?
Let us know!
Walkthrough
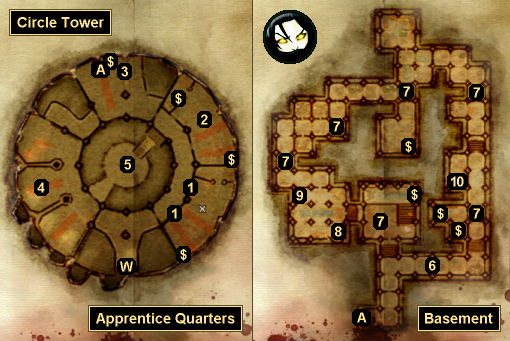
When you enter the Circle Tower, you'll meet Hadley, the templar currently in charge. He'll allow you to explore the first level of the tower without an escort. To learn more about Morrigan's interest in elven books and Eluvian, you should head to the index room (#5), where you'll find four index books. Using these references, you'll need to look up two books in the library (#4):
A Catalog of Elven Relics (found in the Mysterious Artifacts section of the southern library room) and
Translating Elven Languages (found in the History section of the northern library room).
Note: Each index book (#5) is associated with four sections in the library (#4). When you read any entry in an index book, all four associated sections in the library will become available for searching, and any previously available sections will become unavailable. The two exceptions to this rule are the Mysterious Artifacts section and the History section (the two sections required for the DLC). These two sections will stay available permanently once you've discovered that they're needed.
Once you've picked up the two books, you'll meet a mage named Finn, who will reveal himself to be something of an expert on the Eluvians (which he'll explain are "mirrors" or "seeing glasses"). Finn will then tell you where you can find even more information -- from a statue in the tower's basement (#8). To get into the basement (via Exit A), you'll just need to talk to Hadley (#3), who will give you the key but also warn you that the sentinels down there are acting a little funny.
Inside the basement, you'll encounter six groups of corrupted sentinels (#7). Each time you "kill" a sentinel, a veil tear will appear briefly, giving you a chance to attack it. Destroying the veil tear will cause all nearby sentinels to return to normal and stop attacking you. You'll need to destroy all six veil tears before you'll be able to get anything coherent out of the statue.
When you're finally able to talk to the statue (#8), you'll learn that it's possible use one Eluvian to scry for the others, which will no doubt lead you to Morrigan as well. However, to perform this scrying ritual you'll need to pick up a shard of broken Eluvian and the Lights of Arlathan. This will give you two new places to visit: the
Elven Ruins (for the shard) and the
Cadash Thaig (for the lights). You can visit these locations in either order.
Note: After cleaning up the basement, if you return to Hadley (#3), then he'll give you 3 sovereigns.
1 - Locked Doors
You won't be able to unlock these doors unless your main character is a rogue.
2 - Dorm Room
3 - Sandal and Hadley
This is where you'll meet Sandal, who will act as a shopkeeper and an enchanter for you. After greeting you at the tower entrance (Exit W), this is also where you'll find Hadley.
4 - Library
Not counting the books required for the DLC, here are the books that will give you some sort of benefit:
- Autonomous Prodigy, Volume 3: Hexes (under Mage Training). Reading this book will reveal the Self-Improvement section in the southern room of the library.
- Controlled Destruction (under School of Entropy). Inside you'll find a
Bad Luck Charm and
Letter of Payment. If you take these items and visit the northern apprentice dorm (#2), then you'll find a shrouded chest containing 8 sovereigns and 60 silver pieces. We have no idea if the Bad Luck Charm has more of an effect in this DLC than it did in the OC. We couldn't tell any difference.
- Ellie's Exploding Elixirs (under Unstable Solutions). If your main character has the Poison-Making skill, then this book will teach you the recipes for
Dispel Grenades,
Elemental Grenades, and
Soulrot Bombs.
- Franny's Poultice Recipes (under Potent Medicines). If your main character has the Herbalism skill, then this book will teach you the recipes for
Superb Health Poultices and
Potent Lyrium Potions.
- Mabari: A History (under Zoology). You can give this book to your mabari war hound, but it won't do anything.
- Restorative Draughts: The Creation and Distillation Thereof (under Expert Herbalism). Inside you'll find a
Potent Stamina Draught.
- Staff Construction for Apprentices (under Mage Weaponry). Inside you'll find a
Master Barrier Rune.
- This Is Your Brain on Elfroot (under Beginner's Herbalism). Inside you'll find four
Elfroots.
- Tome of Technique: Use It Or Lose It (under Self-Improvement). Taking this book will give you a
Tome of Physical Technique or a
Tome of Arcane Technique, depending on the class of your main character.
- The Willpower Workout (under Self-Improvement). Reading this book will create an essence of willpower (+1 willpower) in the northern library room.
5 - Index Room
6 - Locked Door
You'll only be able to open this door from the eastern side.
7 - Corrupted Sentinels / Veil Tears
8 - Statue
9 - Landmark Device
10 - Chest
Inside this chest you'll find
Vestments of the Seer, a
Paragon Hale Rune, and more.
Exits:
- Basement entrance.
- World exit.


