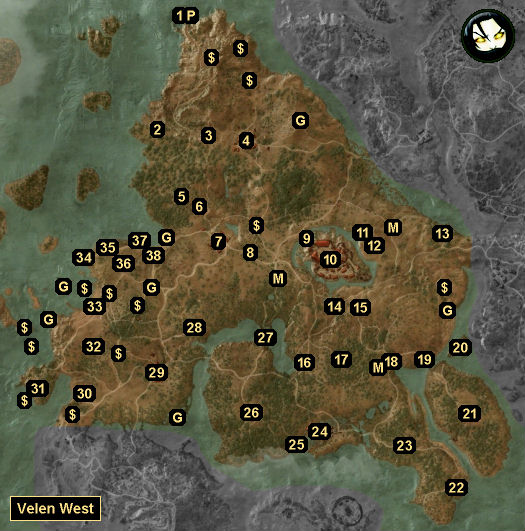
 Did we miss anything in this location? Is there something we didn't discover? Let us know!
Overview
1 - Lornruk / Hidden Treasure
Did we miss anything in this location? Is there something we didn't discover? Let us know!
Overview
1 - Lornruk / Hidden Treasure
When you first reach the lighthouse here, you'll discover that the bridge leading to its main entrance is raised. This will leave you with two options for how to get inside:
- Underneath the Place of Power (P) next to lighthouse, you'll find an underwater passage guarded by a few drowners. The passage will take you to the lighthouse's cellar.
- At the base of the bridge leading to the lighthouse, you'll find some rocks that you can climb. The rocks will allow you to reach the lighthouse's walls, which you should be able to hoist yourself onto and over.
Either way, once you've made it into the lighthouse, you should immediately head for its main entrance and turn the wheel there. That will lower the bridge and make it much easier to get in and out.
The hidden treasure at the lighthouse can be found at the top of the building right next to the lighthouse tower. Inside a treasure chest there, you'll discover the diagram for the
Griffin Silver Sword.
Complicating the lighthouse slightly is the level 14 wyvern that you'll encounter there. The wyvern will mostly circle around the top of the lighthouse tower, and you might be able to get in and out without it noticing you. But at some point you'll want to fight it (just for its body parts if nothing else). We wouldn't recommend starting the battle at the top of the tower. That area is so small that your fighting movements or a push from the wyvern will likely send you over the edge to your death. If you just wait at the base of the tower, then the wyvern will eventually come to you. But if you get impatient, then you can always climb up to the top of the tower, hit the wyvern once with something (like, say, Igni), and then climb back down to the lighthouse courtyard. The wyvern will chase you there.
2 - Isolated Shack
This shack and the cave beneath it are involved in the quest
Wild at Heart.
3 - Abandoned Tower
You can use the rocks on the northwestern side of this tower to climb up into a parapet where you'll find a pair of treasure chests.
4 - Heatherton
Heatherton is involved in the quest
The Nilfgaardian Connection.
5 - Cave
In the back of this cave in a crate, you'll find the diagram for
Ursine Steel Sword - Mastercrafted.
6 - The Pellar's Cottage
This cottage belongs to the pellar. It will start out locked, but you'll gain access to it during the quest
Family Matters.
7 - Blackbough
You'll meet a few people of interest in Blackbough:
- Blacksmith. He's an amateur blacksmith. He'll have a few items for sale, including Adalbert Kermith's Second Map, which might help you during the
Cat School Gear scavenger hunt.
- Merchant. He won't have much for sale other than Adalbert Kermith's First Map, which might help you during the
Cat School Gear scavenger hunt.
- Niellen and Margrit. They're involved in the quest
Wild at Heart.
8 - Peasant
You'll meet a peasant standing next to a defiled shrine here. She'll give you the quest
Defender of the Faith.
9 - Underground Passage
The passage here will give you an alternative route into Crow's Perch (#10). You'll find half a dozen treasure chests in the passage, including one with the diagram for
Wolven Silver Sword - Enhanced, but you'll have to fight a water hag while you're there. To enter Crow's Perch, you'll need to climb onto a ledge in the southern part of the passage. This will take you to a path that will lead you counterclockwise to a ladder. Climbing the ladder will take you into Crow's Perch.
10 - Crow's Perch
This castle is involved in the quests
Bloody Baron,
Ciri's Room, and
Family Matters. Otherwise, it's basically just a big town. You'll find a few things of interest inside:
- Fergus Graem. He's a journeyman armorer. He'll sell you some armor and crafting materials, plus the books Do It Yourself and Care for Your Sword, Soldier (which won't give you any sort of bonuses). Fergus (and Yoana below) will also give you the quest
Master Armorers.
- Quartermaster. He'll have Adalbert Kermith's Third Map (which you might help you during the
Cat School Gear scavenger hunt), a full set of Nilfgaardian equipment, and some gwent cards for sale.
- Trader. He'll sell you food and gwent cards, plus the book
Religion and Life, which you'll need for the quest
Free Spirit.
- Yoana. She'll sell you armor and crafting supplies.
- A notice board. It'll give you the quests
Contract: The Beast of Honorton,
Contract: Shrieker,
Fists of Fury: Velen,
Gwent: Velen Players, and
Races: Crow's Perch.
You'll also find an armorer's table, a grindstone, and a stash.
11 - Shrieker Cave
This cave is involved in the quest
Contract: Shrieker.
12 - Burned Ruins
In a half-buried chest in these ruins, you'll find the diagram for
Enhanced Griffin Trousers.
13 - Voytek's Hut
This hut is involved in the quest
Family Matters. It will remain locked until you reach that point in the game.
14 - Ronvid of the Small Marsh
If you talk to Ronvid here, then he'll challenge you to a duel "to honor maid Bilberry, fairest of all maids." No matter what you say to Ronvid, you'll have to fight him, but he'll quickly surrender once he's taken enough damage. You'll earn 25 xp for defeating Ronvid, and you'll meet him again later (in
Novigrad).
15 - Smokehouse
This smokehouse is involved in the quest
Family Matters.
16 - Claywich
In this village you'll meet a barber (after rescuing him from #36) and a merchant (after rescuing him from #21). The merchant will have gwent cards,
Rugged Saddlebags, and more for sale. You'll also find a pair of grindstones in the village.
17 - Honorton
This village is involved in the quest
Contract: The Beast of Honorton.
18 - Abandoned Site (Boatmaker's Hut)
When you defeat the nearby ghouls and destroy their nest (M), some peasants and a merchant will return to this area, and you'll earn 50 crowns and 120 xp.
19 - Bandits
You'll encounter some bandits at the bridge here. You can either invite them to try and take your money (and fight them) or show them your medallion (and scare them off). The bandits are only level 3, so they shouldn't be any challenge to defeat. After dealing with the bandits, if you turn on your witcher senses, then you'll detect some footprints leading to a treasure chest under the bridge. You'll find a collection of random loot inside.
20 - Island
You'll find lots of
Mandrake Root on this island.
21 - Person in Distress (Merchant)
When you defeat the renegades at the camp here, one of them will drop a key. The key will allow you to free a merchant from his cage. The merchant will then head over to Claywich to the west (#16).
22 - Drudge
This mostly-deserted village is involved in the quest
A Dog's Life.
23 - Friendly Dog
You'll discover a friendly dog here being attacked by wolves. If you rescue the dog, then you'll trigger the quest
A Dog's Life.
24 - Oreton
In this village you'll meet a trader and an amateur blacksmith. You'll also find an armorer's table, a grindstone, and a notice board. The notice board will give you the quest
Contract: The Mystery of the Byways Murders.
25 - Graham's Cottage
Graham is involved in the quest
A Towerful of Mice.
26 - Wastrel Manor Ruins
These ruins are involved in the quest
Greedy God.
27 - Troll Bridge
On the northern side of the raised bridge here, you'll meet three bandits. They'll demand a toll from you. You can pay it (50 crowns), you can use Axii on them to pass for free, or you can fight them. For the first two cases, the bandits will lower the bridge for you. For the latter case, you'll have to walk over to the winch behind the bandits and interact with it to lower the bridge yourself.
28 - Keira Metz's Cottage
Keira is involved in several quests:
Hunting a Witch,
Wandering in the Dark,
Magic Lamp,
An Invitation from Keira Metz,
A Towerful of Mice,
A Favor for a Friend, and
For the Advancement of Learning. Keira is also an herbalist and someone you can romance.
29 - Midcopse
You'll meet a merchant and an amateur armorer in this village. The merchant will have a few gwent cards available, and the armorer will have Edwin Greloff's First Map and Edwin Greloff's Second Map, which might help you during the
Griffin School Gear scavenger hunts. You'll also find a armorer's table, a grindstone, and a notice board. The notice board will give you the quest
Contract: Jenny o' the Woods.
30 - Abandoned Site (Boatyard)
If you defeat the pirates holding this site, then you'll earn 50 crowns and 120 xp, and several peasants including a merchant will return to the location. You'll also find an armorer's table and a grindstone here.
31 - Bandit Camp
In a chest in the bandit camp here, you'll find the diagram for
Griffin Steel Sword - Enhanced.
32 - Abandoned Site (Refugees' Camp)
If you kill all of the renegades here, then you'll earn 50 crowns and 120 xp, and numerous peasants including a herbalist will move back in.
33 - Hidden Treasure (Pirate Camp)
After defeating the pirates here, you'll find some Pirate's Notes on a bedroll. Reading the notes will trigger the quest
Queen Zuleyka's Treasure. You'll also find a couple of treasure chests nearby to the west -- one on the beach and one in the water.
34 - Hidden Treasure (Corpse)
At this spot you'll discover a corpse next to a wrecked rowboat. When you loot the Smuggler's Notes from the corpse, you'll trigger the quest
A Costly Mistake.
35 - Abandoned Site (Cottage)
If you clear away the pirates staying at the cottage, then you'll earn 50 crowns and 150 xp, and some peasants and an herbalist will show up.
36 - Person in Distress (Barber)
If you defeat the refugees in the camp here, then one of them will drop a Cage Key, which you'll be able to use to free a barber. The barber will then head over to Claywich (#16) and set up shop. You'll also find lots of containers in the camp, including two treasure chests.
37 - Hangman's Alley
At this spot you'll witness some peasants preparing to hang a deserter from the Nilfgaardian army. This encounter will trigger the quest
Lynch Mob.
38 - Hidden Treasure (Corpse)
On the shore here you'll find a corpse with a Water-Damaged Letter. Reading the letter will trigger the quest
Sunken Treasure.
G - Guarded Treasure
M - Monster Nest
P - Place of Power
$ - Treasure


