 Did we miss anything in this section? Is there something we didn't discover?
Let us know!
Walkthrough
Did we miss anything in this section? Is there something we didn't discover?
Let us know!
Walkthrough
You can reach the headquarters via the
Ruins. Clearing out the area is optional, but if you decide to do it then you'll no longer have to fight through Black Circle forces to use the mine entrance in the
Ruins. Plus, you'll get to meet the Phlan clerk (#9, #10), who you might remember from the original Pool of Radiance.
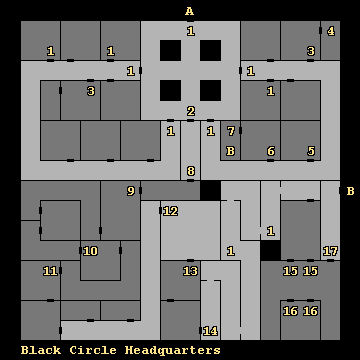
While you're in the headquarters area, if you attempt to rest outside (light gray squares), then you'll automatically get attacked by a group of BC soldiers. Resting inside (dark gray) is safer, but you'll still get attacked sometimes. After defeating the Black Circle forces in the inner sanctum (#16), the Black Circle will disappear from the headquarters, and instead you'll only have to deal with the monsters from the Ruins -- Ogres, Minotaurs and so forth.
1 - Guards
At each of these locations, a random collection of Black Circle soldiers will attack you. If you haven't been to the Well of Knowledge yet, then the first group of soldiers near the entrance (Exit A) will simply ask you to leave.
2 - Secret Door
You'll need to look or search at this location to spot the door.
3 - Black Circle Officer
When you enter this room, a Black Circle officer will exclaim, "They're here! Take me now!" And then he'll disappear.
4 - Bedroom
If you open the trunk in this room, then you'll find a letter from Marcus to the Black Circle. It's contained in Journal Entry 43.
5 - Armory
Inside the armory you'll get attacked a contingent of BC soldiers, but after defeating them you'll find a Dagger +2, a Dart of the Hornet's Nest, and a Quarterstaff +2.
6 - Commander of the Guard
In this room you'll battle the Commander of the Guard (a BC Lord) plus several other BC soldiers. They'll drop a few random items, plus 30 gems and 4 pieces of jewelry.
7 - Desk
On the desk in this room you'll find a report and a map, which you'll record as Journal Entries 16 and 45. You'll also find a key, but it isn't needed for anything. It will simply glow next to the secret door (#2), letting you know that something is there.
8 - Locked Door
You'll find a locked door here, and you'll have to pick it or bash it open. Either way, an alarm will go off when you go through.
9 - Phlan Clerk, Part 1
You'll meet the Phlan clerk here. She's the one mentioned in the report you might have found earlier (#7), and she's also a character you might remember from the original Pool of Radiance (she awarded you numerous commissions). The clerk will be burning papers when you arrive, but she'll miss one before running off to the west. You'll record the letter as Journal Entry 69.
Next up, a mage will pop up in the room. He'll tell you to leave, and then he'll disappear as well. If you refuse to follow his orders, then when you exit the room to the west, he'll roll a fire sphere at you, and it will damage your party for 5-15 points of damage unless you can dispel it.
10 - Phlan Clerk, Part 2
In this room you'll meet the Phlan clerk again. No matter what you say to her, she'll tell you her story, she'll give you a map, and you'll find some more records. You'll record these documents as Journal Entries 55, 49 and 40 respectively. Then the clerk will rush off again.
11 - Mouth / Battle
When you enter this room, a "mouth in the wall" will entreat you to leave. If you refuse, then you'll get attacked by a contingent of BC soldiers. If you agree, then you'll automatically exit through the door you just came through, but if you later enter the room again then you'll get attacked right away.
12 - Mage's Practice Room
You'll face a tougher contingent of BC soldiers here, including a pair of BC Lords.
13 - Library
You'll find some magic scrolls when you enter this room.
14 - Mage Attack
When you enter the hallway here, a mage will send an illusionary force of monsters against you. If you don't recognize the illusion, then your party will take 5-10 damage from the attack. Afterwards, you'll get a chance to attack the mage and his escort if you choose the "attack" option. If you choose "wait" instead, then the mage will get away.
15 - Red Hatchling Breeding Pool
This entire chamber is a Red Hatchling breeding pool. The first time you step into it, you'll face 8 Red Hatchlings. Every grid square in the pool after that (including squares you've already visited) will pit you against 2-6 Red Hatchlings. The hatchlings will stop appearing once you've defeated the forces in the inner sanctum (#16). Surprisingly, it seems to be pretty safe to camp in the pool.
16 - Inner Sanctum / Portal
In this room you'll face off against 4 BC Veterans, 4 BC Lords, 3 BC Necromancers, and 2 BC Wizards. The BC forces will start out far away from you, so you should be able to decimate them with fireballs whether your casters go first or not. At the end of the battle you'll find Bracers of AC 3, a Girdle of Giant Strength, a Wand of Lightning, 1500 platinum, 100 gems, and 6 pieces of jewelry. You'll also find some documents, which you'll record as Journal Entry 53. Finally, with the room cleared, you'll be able to use the portal in the sanctum, which will take you to the
Well of Knowledge (8,1)
17 - Protected Hallway
If you try to enter this hallway before defeating the Black Circle forces in the inner sanctum (#16), then you'll get blown back into the Red Hatchling breeding pool (#15).
Exits
- Main exit to the
Ruins.
- Portal to the
Well of Knowledge (14,14). You'll only be able to use this portal if you've cleared out the
Well of Knowledge.
- Secret exit to the
Ruins.


