 Did we miss anything in this section? Is there something we didn't discover?
Let us know!
Walkthrough
Did we miss anything in this section? Is there something we didn't discover?
Let us know!
Walkthrough
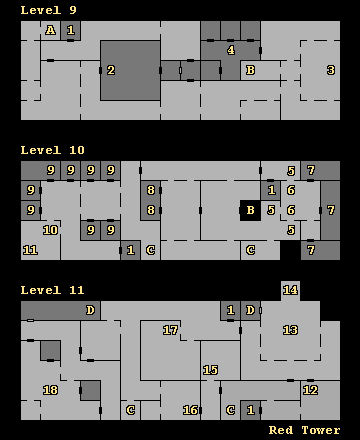
Your goal in the Red Tower is to defeat Marcus at the top. However, when you enter Marcus' chamber (#18), it's possible that a spectral servant will tell you that Marcus is elsewhere in the tower, and he'll ask you to leave. He won't care what you say your name is. The servant will list a location where Marcus is visiting, and what you'll need to do is go to that location and take out the enemies there. In all, you'll have to defeat the Black Mages (#10 and #16), the Cultists of Moander (#3 and #15), and the Red Mages (#7 and #17), and you'll also have to disrupt the diagram room (#12).
When Marcus is finally in his chamber, he won't see you immediately. First he'll send out some of his minions to soften you up. In the first battle you'll have to deal with a Banshee and five Spectres. In the second battle you'll have to deal with two Banite Clerics, a Bit o Moander (Large), four Minions of Bane (Red), and a Moander Cultist. In the third battle, you'll have to deal with four Evil Champions, three Fire Knife Assassins, a Moander Cultist, and two Red Mages. Only the second battle should be tough. Just remember to have Resist Fire spells up to protect you from the fire damage, and also remember that Bits o Moander and red Minions are immune to fire. After the third battle you'll find 10 Bolts +3, 10 Darts +4, a Light Crossbow +3, Scale Mail +4, and a Staff Sling +3.
After defeating the three waves, Marcus will finally attack you, and he'll have two Black Mages, two Minions of Bane (Blue) and a Minion of Bane (Red) with him. Marcus won't have a lot of hit points or any special resistances (except for casting Mirror Image), so the battle should not be too difficult for you. Afterwards you'll find an Elixir of Youth and a Ring of Wizardry.
With Marcus out of the way, Shal and Petra will finally reunite -- literally -- merging together to form one person. You'll record what you see as Journal Entry 79. The merged Shal will leave your party at this point, but then the tower will begin to fall apart, and she'll urge you to make your way to the Vessel of Moander (#14), where you'll be able to make your escape. There isn't a time limit for doing this, but you won't be allowed to rest, and there isn't anywhere else to go, so you might as well do as you're directed.
When you reach the vessel, Shal will tell you to jump onto it. You'll be given several chances to comply, but if you "wait" each time instead, then the tower will collapse with you still inside, and you'll die. When you do eventually jump, you and Shal will end up on the vessel, suspended high above the
Realms Dimension with nowhere to go. Shal will take this opportunity to tell you about the dormant god Moander and how Bane's lieutenant Tanetal has been using it.
Eventually, a portal will appear in the vessel, which you'll be able to use to return to Elminster in Limbo. Shal will take leave of you again when you arrive there, but before she goes she'll give you a Vorpal Long Sword (a +3 sword that has a chance to instantly kill enemies). Elminster will then lower a rope from the vessel, which will allow you to climb back down to the
Realms Dimension. He'll also open the way to
Tanetal's Dimension, where you'll be able to free Moander from Tanetal's influence. With the Red Tower out of the way, you'll also be able to climb down the rope to
Phlan and use it as a town once again. We'd recommend that you do that before heading out to face Tanetal.
1 - Closets
If you look or search in the closets, then you'll see if it's safe to rest in them.
2 - Map Room
You'll see a map of the
Realms Dimension painted on the floor. You'll record what you see as Journal Entry 10. One of the "chess pieces" will be of Marcus, and next to him you'll see a female piece that looks just like Shal. If Shal with you, then she'll identify the female piece her sister Petra.
3 - Skull Shrine
You'll see people coiled in the foliage here. If you cut them down, then you'll discover that they're really Moander Cultists who fed themselves to the vines. The cultists will attack you for your blasphemy, and you'll have to deal with a Bit o Moander (Small), four Moander Cultists, two Swordsmen, and two Walking Trees. If you don't fight the cultists here, then you'll encounter them in the barracks (#4).
4 - Cultist Barracks
5 - Voices
At one of these spots you'll hear Red Mage voices nearby, and you'll be asked if you want to wait. If you do, then you'll overhear the code word "red" for imminent danger from another coven.
6 - Red Mages
When you enter this chamber you'll get attacked by two Red Mages.
7 - Red Mage Quarters
If you knock on one of these doors and say "red," then all of the Red Mages in the area will rush out and attack each other, and save you the trouble of killing them. If you don't say "red," then inside each room you'll encounter Dark Warriors, Minions of Bane (Black), and Red Mages, and you'll have to kill them yourself.
8 - Tower Guards
Inside this room you'll get attacked by two Banite Clerics, two Evil Knights, three Margoyles, and three Swordsmen.
9 - Black Mage Quarters
In each of these quarters you'll find a small number of Black Mages and possibly Dark Lords.
10 - Ghastly Fountain
When you arrive at this fountain, you'll get attacked by two Banite Clerics, two Bits o Moander (Small), and three Black Mages. Then when you leave the room with the fountain, you'll get attacked again, this time by several Black Mages -- the number depending on how many Black Mage quarters (#9) you've cleared out -- three Earth Elementals, three Evil Champions, and two Dark Lords.
11 - Treasure
At this spot you'll find a treasure cache consisting of Boots of Speed, a cleric scroll, a Mace +2, a Quarter Staff +1, and a Staff Sling +1.
12 - Diagram Room
When you enter this room, you'll see monsters trudging around a diagram. If you "attack" them, then you'll enter combat against two Bits o Moander (Small), two Bits o Moander (Medium), and a Bit o Moander (Large), and that will be the end of it. If you "move" or "listen," then you'll be able to go to the eastern side of the room, where you'll spot a cleric directing traffic. If you "attack" at this point, then you'll face the same battle as mentioned before. But if you "join line" and "attack" a "beast" five times, then you'll get to fight the Banite Cleric along with three Minions of Bane -- one Blue, one Black, and one Red. You'll need to complete one of these battles to clear the room.
13 - Temple of Transformation
When you enter the temple, you'll record what you see as Journal Entry 56. If you attack the worshippers, then you'll have to battle two Banite Clerics, two Moander Cultists, two Red Mages, and four Rogues.
14 - Vessel of Moander
When you reach the vessel, you'll record what you see as Journal Entry 4.
15 - Manufactory of Moander (Cultists)
Inside this room you'll get attacked twice: the first time by a Banite Cleric and ten Moander Cultists and then by a Bit o Moander (Small) and two Bits o Moander (Medium).
16 - Manufactory of Moander (Black Mages)
Inside this room you'll get attacked by two Bits o Moander (Medium) and three Black Mages.
17 - Manufactory of Moander (Red Mages)
Inside this room you'll get attacked by a Banite Cleric, two Bits o Moander (Large), and two Red Mages.
18 - Marcus' Chamber
Exits
- Stairs down to
Level 8. A wizard gate will block you from using these stairs.
- Stairs between Level 9 and Level 10.
- Stairs between Level 10 and Level 11.
- A long tunnel.


