 Did we miss anything in this section? Is there something we didn't discover?
Let us know!
Walkthrough
Did we miss anything in this section? Is there something we didn't discover?
Let us know!
Walkthrough
When you enter the ruins of Myth Drannor, you'll meet Princess Nacacia at a glen just outside. She'll tell you that rakshasas, walking trees, and more have been coming out of the ruined city, and she'll ask you to help her find out what's going on. If you say "yes" then she'll give you 8 Blessed Bolts, 10 Bolts +4, and a Light Crossbow +4, and she'll join you. Nacacia is a level 11/9 thief/ranger with decent stats and equipment. She'll stay with you while you're in Myth Drannor.
Rakshasas will be your main opponent in Myth Drannor. They're immune to spells under level 8, and you'll need +4 weapons to guarantee full damage against them (otherwise they'll be immune or only take half damage). Rakshasas are also spellcasters, and they just love Fireballs, but luckily they're not high level casters, so the spells won't do much damage.
You'll also encounter some gazing creatures: Basilisks, Dracolisks, and Medusae (#6). Silver Shields and Mirrors will reflect their gazes, but otherwise just be sure that one of your magic-users has some Stone to Flesh spells memorized.
Myth Drannor isn't very large, and it shouldn't take you long to figure out that the rakshasas are trying to bring Tyranthraxus (the bad guy from Pool of Radiance) back to life to please Bane. You'll find the reincarnation ritual on the western side of the city (#15). When you reach it you'll disrupt it, and you'll have to battle seven Rakshasas, a Rakshasa Mah(arajah), two Rakshasa Rajahs, and two Rakshasa Rukhs. Resist Fire is a good idea to cast before going in, along with whatever buffs you normally use.
For the battle itself, you'll find the rakshasas arranged in three groups. We'd recommend splitting your fighters between two of the groups, and using Meteor Storm on the farthest group. Also be sure that somebody is using a crossbow with Blessed Bolts, since such bolts will kill rakshasas (including the Rakshasa Mah) with one hit.
After defeating the rakshasas, Nacacia (if she's with you) will invite you to return to the glen where you started, which means you should go to the exit (Exit A). When you get there, Nacacia will reward you with 10 Arrows +4, 10 Bolts +4, Elfin Chain +4, a Fine Long Bow +2 (which is better than a Composite Longbow +4), a Light Crossbow +3, 250 platinum, and 14 pieces of jewelry, and then she'll leave your party.
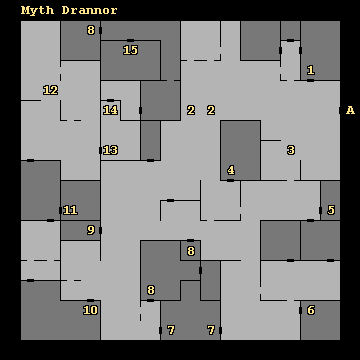
1 - Rakshasa Battle
When you enter this building you'll get attacked by five Rakshasas and a Rakshasa Rukh.
2 - Rakshasa Ambush
In one of these two squares you'll get ambushed by eight Rakshasas and three Rakshasa Rukhs, but a few of Nacacia's knights will leap to your aid.
3 - Drag Marks
If you have Nacacia in your party, then at this spot she'll notice that something heavy was dragged to the south. This is probably referring to a knight captured by the rakshasas (#7).
4 - Fake Elf
You'll meet an elf in this structure. If you "detect magic" (which requires that one of your characters has the spell memorized), then you'll discover that the "elf" is really a Rakshasa Rajah. If you then "threaten" the rajah, then it will reveal to you that the rakshasas are planning to reanimate Tyranthraxus, and you'll record this information as Journal Entry 78. Any other action you take with the "elf" will cause you to fight it.
5 - Storage Shed
If you look or search in this shed, then you'll find 10 Arrows +4, 8 Blessed Bolts, 10 Bolts +4, a Composite Longbow +3, and a Light Crossbow +3.
6 - Medusae Ambush
When you enter this building you'll get ambushed by Basilisks and Medusae. Some of Nacacia's knights will help you out in the battle.
7 - Rakshasa Battle
When you enter this building you'll witness some rakshasas draining the life from a knight. This will lead to you fighting five Rakshasas, a Rakshasa Rajah, and three Rakshasa Rukhs. Some of Nacacia's knights will help you out.
8 - Safe Rooms
These rooms are safe to rest in.
9 - Elf Skeleton
Inside this building you'll have to fight six Spectres, but after the battle you'll find an elf skeleton wearing fine armor. If you loot the skeleton, then you'll find 4 Blessed Bolts, 10 Bolts +4, a Girdle of Giant Strength, and a Light Crossbow +2. If you don't loot the skeleton, then you'll earn 50,000 xp, and Nacacia (if she's in your party) will thank you for respecting the dead.
10 - Temple
You'll interrupt religious teachings in the temple, and you'll get attacked by nine Banite Clerics and seven Rakshasas.
11 - Dead Knights
In this room you'll find a pile of dead knights. If Nacacia is with you, then the scene will depress her, and she'll leave your party. However, if you "comfort her" or "stand her up," then she'll rejoin you.
12 - Spider Ambush
When you reach this location, five Enormous Spiders and seven Giant Spiders will ambush you, but four of Nacacia's knights will come to your aid.
13 - Fake Knight
This knight is exactly like the fake elf (#4), right down to disclosing the same Journal Entry.
14 - Stuck Door
You'll have some trouble with this door. "Knock" won't do anything. "Bash" will only work if the basher is wearing a Girdle of Giant Strength or is buffed with the Enlarge spell. "Climb Over" will only work if the climber has a high enough dexterity (17 is enough, which conveniently is how much Nacacia has).
15 - Reincarnation Ritual
You'll enter this room just as the rakshasas are finishing their ritual to bring Tyranthraxus back to life. No matter what you do, you'll disrupt the ritual and you'll start a battle, but if you "dispel evil" or "smash globes" then you'll earn 25,000 extra xp.
Exits
- Exit to the
Realms Dimension.


