 Did we miss anything in this section? Is there something we didn't discover?
Let us know!
Walkthrough
Did we miss anything in this section? Is there something we didn't discover?
Let us know!
Walkthrough
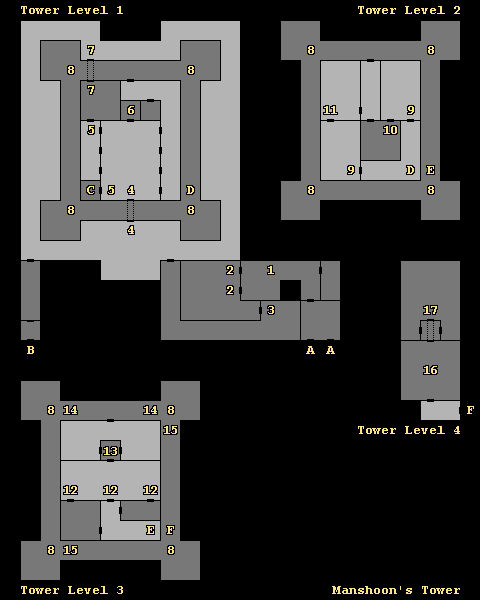
Your goal in the tower is to defeat Manshoon at the top (at #16 or #17). To get to him, you'll have to do a lot fighting, including battles against some dragons (#12) and a Beholder (#13). When you reach the top level, you'll discover a diagram (#16). If you step inside, then Manshoon will trap you there, and he'll summon a harpy to defeat you. Unfortunately for Manshoon, the harpy won't be happy about this predicament, and not only will she allow you to leave the diagram, but she'll also start tearing down the top level of the tower. Manshoon will escape during the confusion but his power will be broken, which is about as good.
If you don't step into the diagram, then you'll get a variety of options when you reach Manshoon's chambers (#17), but they'll give you about the same result. If you "shoot" at Manshoon, then you'll hit his spellbook and disrupt his spell, which will cause the harpy to appear and begin tearing down the top level of the tower. If you "wait" or "charge" or try to use "magic," then Marshoon will either sic some minions on you (four Drow Priests, eight Great Margoyles, and four Zhentil Mages), or he'll open up a trap door, which will drop you onto the diagram below (#16).
You'll also need to pass through at least some of Manshoon's Tower so you can reach Kalistes in her dimension (via Exit C). You'll need to kill Kalistes for the main questline.
1 - First Examination
In this room you'll meet seven clerics who will ask you some questions. If you get them right, and if you have the Horn of Doom (from Thorne in
Thorne's Cave), then they'll allow you to pass. Otherwise, you'll have to fight seven Banite Clerics and five Earth Elementals.
2 - Second Examination
In this room you'll meet ten Liches who will want to look over your equipment. If you attack the Liches, or if you refuse their request, or if you have the Horn of Doom (from Thorne in
Thorne's Cave) or the Crystal Ring (from Kalistes in
Kalistes' Parlor), then they'll eventually fight you -- but if you keep choosing "resist," then you'll discover that they're really Zhentil Mages in disguise. Otherwise, if you choose "fight" instead of "resist," then you'll have to fight whichever creature the mages are currently pretending to be (so don't "fight" when they're White Dragons). At the end of the battle you'll find a Cloak of Protection +2, 10 Darts +4, 40 gems, and 2 pieces of jewelry.
If you allow the Zhentil Mages to search you, and if you don't have the Horn of Doom or the Crystal Ring, then the mages will disappear and leave you unharmed.
3 - Way Tax
12 guards here will try to charge you 10 gems per character as a "way tax." If you "resist" then you can negotiate the guards down to 4 gems per character. Or you can fight them and face two Red Mages, six Rogues, two Zhentil Mages, and two Zhentil Warriors. At the end of the battle you'll find 76 platinum, 43 gems, and 2 pieces of jewelry.
4 - Main Tower Entrance
When you approach this entrance (from outside the tower), you'll get attacked by two Evil Champions, two Red Mages, two Swordsmen, and eight Zhentil Warriors. When you go through the entrance, you'll pass under the "ramparts" between the doors (and actually move two squares).
5 - Battle
At one of these two spots you'll encounter seven Banite Clerics, two Drow Priests, a Drow Sorceress, and three Swordsmen. After the battle you'll find a cleric scroll, a Dagger +4, 10 Darts +4, Elfin Chain +2, a Light Crossbow +4, and a Trident +4.
6 - Deep Shaft
This is where the drow wagons get lowered into
Drow Stronghold, but you won't be able to descend here. You'll need to use a nearby staircase (Exit C) instead.
7 - Back Tower Entrance
When you go through the entrance, you'll pass under the "ramparts" between the doors (and actually move two squares).
8 - Towers
Enemies will frequently gather here and then attack you when you wander by.
9 - Fanatics
In one of these rooms you'll encounter "fanatics," which means you'll have to battle two Banite Clerics, seven Rogues, and two Zhentil Mages.
10 - Zhentil Guards
In this room you'll encounter two Evil Champions, three Evil Knights, three Zhentil Mages, and six Zhentil Warriors.
11 - Gloomy Room
In various places in this room you can get attacked by spiders, including Gaze Spiders, Giant Spiders, Pets of Kalistes, and Stone Spiders.
12 - Dragon Ambush
In one of these three spots, you'll have to battle four Black Dragons, four Green Dragons, and a Red Dragon. The difference between the battles is that if you go through the middle door, then the dragons will ambush you, and they'll be separated into three groups, making them more difficult to damage. If you go through one of the side doors, then you'll surprise the dragons, and you'll find them all clumped together, making them easy prey for a couple of Delayed Blast Fireballs.
13 - Manshoon's Adjutant
When you enter this room, you'll encounter Manshoon's adjutant (a Beholder) plus three Ettins, two Fire Giants, and two Salamanders. The Beholder is the only dangerous enemy here -- among other things, it has death ray eyes -- but it's highly resistant to spells, so send your fighters and ranged attackers after it, and then mop up the rest once it's dead. After the battle you'll find 10 Bolts +4, 10 Darts +4, and a Ring of Cold Resistance.
14 - Great Voice
At one of these two points you'll hear the "great voice" of Manshoon, who will warn you about his pet Gelt (#15). You'll record this warning as Journal Entry 26.
15 - Gelt
At one of these two points you'll run into Manshoon's pet Gelt. Gelt is basically a trap. He'll damage you if he can see you, and he'll prevent you from reaching the staircase leading to Tower Level 4 (Exit F). To avoid Gelt's damage, you'll have some options. If any character in your party (including Traned if you met her in the
Drow Stronghold) has a Silver Shield or Mirror equipped, then Gelt will see himself and die. You can also cast Invisibility, 10' Radius or Power Word, Blind to slip by unseen.
16 - Diagram
In the center of the diagram here you'll find a Necklace of Missiles, but if you enter the diagram then you'll get trapped inside. A couple of turns later Manshoon will show up, and you'll record his taunts as Journal Entry 59. Manshoon's victory will be short-lived, however, as the harpy he summons to kill you will take offense at him instead, and not only will she allow you to escape the diagram, she'll also start tearing down the top of the tower. Manshoon will exit stage left during the confusion, and you should follow suit, as from this point on any step you take on Tower Level 4 will possibly cause you some minor damage.
17 - Manshoon's Chambers
Exits
- Exit to
Zhentil Keep.
- Exit to
Zhentil Keep. If you take one step away from the exit, then a wall will close behind you, preventing you from leaving the area. So this is basically a one-way entrance into the keep.
- Stairs down to the
Drow Stronghold.
- Stairs between Tower Level 1 and Tower Level 2.
- Stairs between Tower Level 2 and Tower Level 3.
- Stairs between Tower Level 3 and Tower Level 4.


