 Did we miss anything in this section? Is there something we didn't discover?
Let us know!
Walkthrough
Did we miss anything in this section? Is there something we didn't discover?
Let us know!
Walkthrough
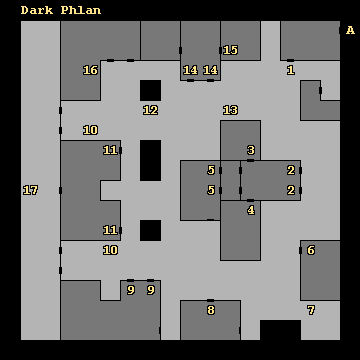
When you enter Dark Phlan from Limbo (at Exit A), you'll witness Sasha being carried away by drow. Sasha will scream for help, but before you can do anything she'll get hustled through the door to the south, and three Drow Priestesses and a Drow Sorceress will attack you. After the battle, along with the normal things that the drow drop (including a Drow Long Sword +3 from the sorceress), you'll find 10 Arrows +4, 30 Arrows +3, a Cloak of Displacement, a Composite Short Bow +4, 10 Darts +4, and a Quarter Staff +4.
When you follow Sasha out of the building, you'll get caught in a "tide of monsters" (#1). This will force you to move towards the town hall (#2), where you'll witness the undead Porphrys Cadorna announcing his plans to marry Sasha. If you "attack" or try to "escape," then you'll have to fight nine Minions of Bane (Black), 19 Wraiths, and ten Wights -- a tough battle that's probably better to avoid. If you "listen," then you'll have to hear about Cadorna's honeymoon plans (which you'll record as Journal Entry 76), but you'll be allowed to leave unscathed.
Dark Phlan is a mirror image of eastern
Phlan -- just more evil, with lots of undead creatures and Minions of Bane wandering around. The city is optional, but you might want to explore everywhere to build up your xp and equipment because you'll need all the help you can get for what's coming up next. You might also want to rescue Sasha from her plight.
1 - Tide of Monsters
2 - Town Hall
When you enter the town hall, guards will order you to leave. If you don't, then you'll have to face six Dark Warriors, six Minions of Bane (Black), and 14 Skeletons. The Dark Warriors will drop Helms +1 and more.
3 - Treasury
Inside the treasury you'll encounter five Vampires, three Vampire Clerics, three Vampire Mages, and two Vampire Thieves. But after the battle you'll find 10 Arrows +2, 10 Arrows +3, Banded Mail +4, 20 Bolts +4, Bracers of AC 2, Elfin Chain +3, two Javelins +4, a Javelin of Lightning, Plate Mail +4, a Ring of Protection +4, a Shield +4, a Short Sword +4, 300 platinum, 200 gems, and 7 pieces of jewelry.
4 - Library
In this room you'll meet Gragnak Ulfim, who kidnapped Sasha for Cadorna. If you "wait," then you'll hear his story, which you'll record as Journal Entry 62. If you "attack," then you'll face a single Rogue (who will drop a Sling +2 if you need one).
5 - Council Chamber
In this room you'll run into Porphrys Cadorna, who won't be happy to see you. He'll order his guards to attack you while he makes his escape through the one-way door to the south. You'll then have to defeat six Minions of Bane (Blue) and a dozen Wights. Blue minions reflect melee damage, so try to kill them with ranged attacks and spells while your fighters deal with the Wights.
6 - Inn
You can rest safely in the inn. You can also ask for "information," which you'll record in Journal Entries 22 and 60. Or you can ask for "a fight," which will create a random battle for you. You can fight in the inn twice.
7 - Vampire Battle
At this spot you'll encounter four Vampires, a Vampire Cleric, and a Vampire Mage.
8 - Drow Battle
In this room you'll witness some drow ensorcelling Sasha's wedding gown, but then they'll notice you and attack, and you'll have to fight four Drow Priestesses, two Drow Sorceresses, and a Drow Wizard. After the battle you'll have to decide what to do with the gown. If you "burn" it, then every character in your party will earn 200,000 xp. If you "take" it or "leave" it, then as far as we can tell, nothing will happen.
9 - Temple
You'll witness Cadorna undergoing a ritual here. However, he'll spot you and escape, and you'll get attacked by a dozen Banite Clerics, three Minions of Bane (Red), and nine Skeletons. Afterwards, if you plunder the temple, then you'll find 20 Arrows +3, 10 Arrows +4, a Composite Long Bow +3, a Shield +3, a Staff Sling +3, 150 gems, and 15 pieces of jewelry.
10 - Gothmenes Greeting
At one of these spots (or nearby), Gothmenes will sneer at your chances of defeating him. Then he'll send out three Minions of Bane (Blue), six Minions of Bane (Black), and two Minions of Bane (Red) to attack you from behind.
11 - Park
When you enter the park, you'll get attacked by four Walking Trees.
12 - Monuments
Somewhere around here you might run into some Minions of Bane erecting a monument. If you stop them, then you'll earn some bonus xp.
13 - Sasha
Somewhere around here you'll witness Sasha being paraded around the courtyard.
14 - Guards
The guards here will notice you when you enter the building. You'll get an option to "bluff" them, but this never worked for us, so you'll probably have to "attack" them and fight an Evil champion, two Evil Knights, and eight Swordsmen. Evil Knights drop Plate Mail +2, which you might find useful.
15 - Minions of Bane
In this room you'll get attacked by a Dark Lord, four Minions of Bane (Black), two Minions of Bane (Blue), and a Minion of Bane (Red). The Dark Lord will drop a Long Sword +3, Plate Mail +3, and a Helm +1.
16 - Cadorna / Wedding
Somewhere around this spot you'll witness Cadorna attempting to marry Sasha. You'll have two choices for what to do next:
- If you leave Sasha to her fate, then you'll end up battling Cadorna plus ten Dark Lords and eight Minions of Bane (Red), and that's where the encounter will end.
- If you rescue Sasha, then you'll have to fight Cadorna plus nine Banite Clerics, eight Dark Lords, and five Minions of Bane (Red). Afterwards, each character in your party will earn about 600,000 xp, and Sasha will reward you with two Rings of Protection +2. Sasha will also promise a better reward for you when you return to Phlan after defeating Gothmenes, but at that point she (and everybody else) won't remember any of your actions, and you won't receive anything extra.
17 - Iron Wall
The iron wall stretches across the western side of the city, and it will prevent you from passing through. You'll get options to "knock" it or "bash" it, but they won't do any good. To pierce the wall, you'll have to use the Horn of Doom (from Thorne in
Thorne's Cave). However, when you make the attempt, Gothmenes will show up, and he'll sic ten Minions of Bane (Black), three Minions of Bane (Blue), and three Minions of Bane (Red) on you. After defeating the minions, you'll have to blow the horn one time for each character in your party. This will earn you some bonus xp and allow you to move on to
Gothmenes' Palace.
Exits
- Portal to Limbo.


