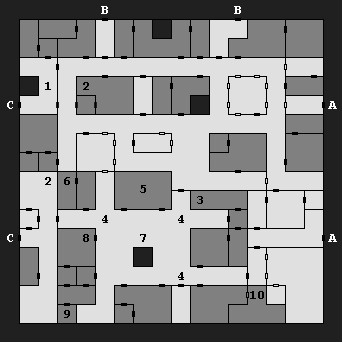
 Area Note
Watch out for the ghouls and wights in this area. They can level drain your characters.
1 - Well to Thieves Guild
If you have a thief in your party, then the thief can climb down the rope ladder here and speak with the Thieves Guild. Other characters will fall and lose almost all of their health, and then be teleported back to the surface. The thieves can sneak you into the textile house (you'll arrive at #7), allowing you to avoid a battle.
2 - Diary Page
You'll find a diary page here (
journal entry 11). Possibly this location is just random on the map, and changes every time you enter the area.
3 - Dead Hobgoblin
You'll find the words "Skullcrusher was here" written in blood next to the dead hobgoblin. If you search, you won't find anything, and if you destroy the body, nothing will happen.
4 - Hobgoblin Attack
If you sneaked into the textile house via the Thieves Guild and the wells (see #1), then you won't have to fight the hobgoblins here. Otherwise your non-stealthy approach will alert them, and a battle will start up.
5 - Barracks
You'll face a bunch of hobgoblins here.
6 - Hobgoblins
You'll face a bunch of hobgoblins here.
7 - Well from Thieves Guild
This is where you'll arrive in the textile house if you sneak in via the Thieves Guild. It's a one-way trip.
8 - Temple
You'll face Grishnak and a bunch of hobgoblins here. "Feel my infernal wrath!" When they're dead you'll find a whole bunch of loot: a
cursed necklace, a
brass key (which unlocks Skullcrusher at #9), a
potion of healing, a
stone statuette, and two
magic user scrolls (containing a variety of spells, including "burning hands").
9 - Skullcrusher
The door is locked, but you should be able to bash or pick it open. Inside you'll find Skullcrusher, who is Councilman Cadorna's servant, plus a diary page (
journal entry 47). If you have the
brass key from #8, then you can free Skullcrusher and add him to your party. He'll stay with you until you reach the Council Building in the Civilized District, and then he'll leave to join Cadorna.
10 - Chief of the Hobgoblins
The chief is a 10-foot ogre. "I'll crush the life from your limbs!" The battle involves the ogre plus a bunch of hobgoblins, but it probably won't be any more difficult than many other battles you've fought at this point.
After the fight, you'll find an iron box with Cadorna's seal across the lock. The box contains a (plain)
ring, a
jeweled dragon statuette, a
jewel studded bowl, a
gold banded wand, and
gauntlets of ogre power, but if you open it and break the seal, Cadorna will notice and be ticked off at you.
To get around the problem, you can visit the Thieves Guild at #4. They'll offer to duplicate the seal for you in return for half of the treasure, but they'll only take half of the money and gems inside, and leave to real loot for you.
Exits:
A. Gate to Mendor's Library.
B. Gate to Podal Plaza.
C. Gate to the Wilderness.


