 Area Note
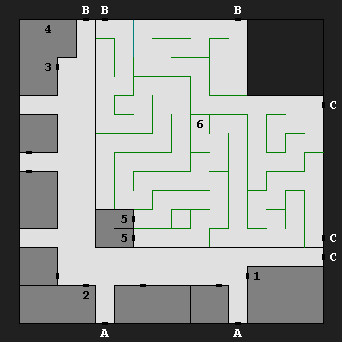
Your goal in the castle is to kill Tyranthraxus. (You should have heard his name a few times in the areas leading up to the castle, but if you missed it before, people will talk about him liberally in the castle, especially in this quadrant.) He's located upstairs in the inner part of the castle. You can reach the inner part of the castle through entrances in the Northwestern and Southeastern Quadrants.
The interior of the castle is made up largely of a hedge maze (shown with green walls). You can move through the walls of the maze if you want, but each time do, it's possible one of your characters will be killed.
1 - Laundry Room
You'll find women washing clothes here. They'll want to help you, so accept the disguises that they give you, and then leave them alone. The disguises will make it easier for you to make your way through the castle.
2 - Smithy
You can talk to the smith if you want, but nothing much will come of it (there doesn't seem to be a way to get him to sell you things). In fact, even if you're disguised (see #1), he'll probably attack you, and then you'll have to face him and three fire giants. When the group dies, you'll find a
long sword +1 and
chain mail +1.
Also, somewhere along the southern edge of the room, you should discover the smith's stash of equipment. However, the stash only contains basic stuff, and it might not be worthwhile.
3 - Temple of Bane
Chances are, no matter what you do, you'll have to fight the priest and the two acolytes here. So don't accept the blessing of Bane (it will just damage the good and neutral characters in your party), and don't try to leave without worshipping (you'll get hit by a "fireball" spell). Instead, just attack them. When they die you'll find
plate mail +1, a
mace +3, and a
necklace of missiles.
4 - Altar
You'll find an offering box and a pair of crossed swords here. If you loot the offering box, then your entire party will be damaged, and you'll only find a few silver pieces. If you take the swords, nothing will happen to you, but the swords are cursed, and your characters will take damage if they try to equip them.
Also, if you steal anything from the altar, then the guards in the rest of the castle will be able to tell, and they'll attack you on sight (otherwise, you might be able to talk your way past them).
5 - Guard Post
You'll find three hill giants here. If you "parlay" with them and act "haughty," you can tell them that "tyranthraxus" sent you, and then they'll leave you alone.
6 - Teleporter
This teleporter will take you to one of the other teleporters in the inner part of the castle.
Exits:
A. Passage to the Stojanow Gate.
B. Passage to the Northwestern Quadrant.
C. Passage to the Southeastern Quadrant.


