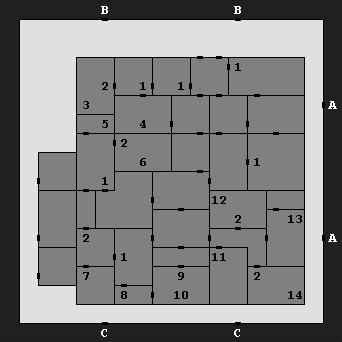
 1 - Thief
In this room a thief will rush up to you and attack. If you're lucky, you'll get the option of attacking him back or letting him go (it doesn't seem to matter which you decide to do). If you're unlucky, the thief will backstab one of your characters and then disappear.
2 - Trap
If you're lucky, you'll notice the trap before triggering it, giving you the option to "avoid" it or "disarm" it. (Being in "search" mode might increase the likelihood that you'll notice the trap, but it doesn't guarantee anything.) For this case, assuming you have a thief in your party, you should try to disarm it. If you don't, you'll just have to deal with the trap again the next time you step into the square.
If you're not so lucky, then you'll trigger the trap when you enter the square. Fortunately, the traps don't seem to do a lot of damage.
3 - Pile of Weapons and Shields
Chances are that when you attempt to loot the pile, several first level thieves will attack. Once they're dead you'll find a variety of equipment, including a cursed
broad sword -2,
chain mail +1, a
shield +2, a
short sword +1, a
scimitar +1, a
morning star +1, a
hammer +1, and a
dagger +1.
4 - Two Thieves
Two thieves will attempt to attack you here, but then they'll run away. If you chase them, they'll split up. The one who heads south will lead you to an ambush. You'll catch the one who heads east. He'll claim to be the guildmaster but he isn't, and you'll be given the option to "attack" him or "release" him. As with the thieves in #1, it doesn't seem to matter which you do. In fact, it's probably best to ignore the two thieves when you first see them, rather than give chase.
5 - Map
You'll find a crude map here (
journal entry 29).
6 - Table with Four Caskets
The four caskets are trapped, but they also contain jewelry and gems.
7 - Cabinet
Inside the cabinet you'll find two
clerical scrolls (with second and third level spells on them) and four
magic user scrolls (with a whole slew of spells, including "fireball" and "haste," on them).
8 - Slate
You'll find a map drawn on the slate (
journal entry 41).
9 - Ambush
You'll be attacked by about 20 first level thieves in this room. The thieves only have 4 hit points each, so it should be an easy battle.
10 - Files
You'll find a couple "important looking" files on the floor here (
journal entries 38 and 51).
11 - Jail
When you enter the jail you'll have to fight ten first level thieves. Once they're dead you'll be able to talk to a dying old thief, who will tell you, "The Boss has allies everywhere. Take these papers. They may help." The papers constitute
journal entry 48.
12 - Loot
You'll find a
short sword +2 and
leather armor +4 with the loot.
13 - Three Cabinets
Inside the cabinets you'll find files (
journal entries 14 and 23), 1500 silver pieces and 1800 gold pieces.
14 - Rugs and Tapestries
You'll find 26
huge tapestries and two
fine tapestries here, but they'll probably be too heavy to take.
Exits:
A. Gate to the Wilderness.
B. Gate to the Graveyard / Wilderness.
C. Gate to the Wealthy District.


