 Did we miss anything on this map? Is there something we didn't discover? Let us know!
The Dustmen's headquarters is a collection of windowless vaults that rise like a giant's mausoleum above the surrounding shacks. They're all dark, catacombed, vaulted, and chambered halls filled with sods living on the lives of others. Grim traffic trundles down the silent lanes to its doors - creaking wagons of the dead, driven by the skullfaced, their eyes hollow, their cheeks sunken from the years of their ashen work. The bodies pass through the doors and then beyond. Behind the doors of the Mortuary is one of the largest concentrations of portals in Sigil. There's doorways to everywhere, or at least one to every plane, including the Prime Material and most of its worlds. There, the Dustmen and their undead assistants send the city's corpses to other worlds where they belong.
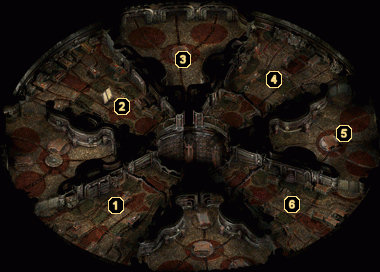
1 - Mortuary Slab
Did we miss anything on this map? Is there something we didn't discover? Let us know!
The Dustmen's headquarters is a collection of windowless vaults that rise like a giant's mausoleum above the surrounding shacks. They're all dark, catacombed, vaulted, and chambered halls filled with sods living on the lives of others. Grim traffic trundles down the silent lanes to its doors - creaking wagons of the dead, driven by the skullfaced, their eyes hollow, their cheeks sunken from the years of their ashen work. The bodies pass through the doors and then beyond. Behind the doors of the Mortuary is one of the largest concentrations of portals in Sigil. There's doorways to everywhere, or at least one to every plane, including the Prime Material and most of its worlds. There, the Dustmen and their undead assistants send the city's corpses to other worlds where they belong.
1 - Mortuary Slab
You will begin the game by waking up on a slab within this odd mortuary. If you watched the game's introductory cinematic, you will get a glimpse at some of the inner demons that plague the Nameless One as he is wheeled into the mortuary. These images pose a lot of questions, but we're going to sort them out.
A floating skull named Morte will start you off on your quest of finding out more about yourself. He'll also make a suggestion to kill the nearby zombies to find a key out of the current room. There are three zombies to fight here, so you'll probably want to grab the scalpel from one of the shelves on the north wall first (although your fists work great, too). Be sure to check the zombies' bodies for the Preparation Room Key after you have slain them (the other two will drop Bandages), and you'll also want to ransack every container that you find on this level for other helpful items.
This room is also important toward the end of the game. Eventually, you will return to the Mortuary to open a portal to the
Fortress of Regrets in the Negative Material Plane. When you do, you'll find that the portal can only be opened from this room.
2 - Zombie Worker #1201 and Dhall
Grab the Receiving Log Book from the second shelf in this room for some useful information about the mortuary, and then search the room for zombie #1201. When you find it, you'll notice that there is a note sewed into its mouth. Use your scalpel to cut the zombie's stitches and remove the note unharmed for 250 experience points.
The note appears to be the person's final effort to request cremation rather than being Raised as a zombie, but it apparently never made it to the Dustmen responsible. If you use the note, you'll find that it can be folded into a pattern. If you choose Upper Right (1), Lower Right (2), Upper Left (0), Upper Right (1), and Open the Sides of the Pyramid, then the note will disintegrate into dust and a small triangle-shaped earring will fall into your hand. This will earn you another 250 experience points plus a
Rule-of-Three Earring.
Also in this room you will meet a scribe named Dhall who will recognize you as a frequent visitor to the mortuary. He'll explain how you arrived here, that a man named Pharod might have taken your journal from you, and that a Dustman on the level below holds a key to the Mortuary's exit.
3 - Zombie Worker #1664
This room doesn't contain anything of interest other than a zombie marked with the number "1664". If you examine the books the zombie is holding, you'll notice a loose page that turns out to be a list of dead bodies recently brought to the Mortuary, including your own.
4 - Zombie Worker #506, Zombie Worker #985, and Ei-Vene
In this room you will meet a Tiefling Dustwoman named Ei-Vene who is hard at work dissecting one of the corpses. When you're finally able to get her attention, she'll ask you to find a Jar of Embalming Fluid and a Needle and Thread. Both of these items can be found on this floor - the fluid on a table at area #6 and the thread from zombie #506 in this very room. Bringing these to her will earn you 250 experience points and, if you wait and let her stitch you up, a permanent +1 bonus to your hit points.
Additionally, if you study the motion of Ei-Vene's hands while she is dissecting, you will recall stitching something useful inside a zombie marked with the number "42" during one of your past lives. This will earn you 250 additional experience points and allow you .
Finally, if you're working with the Anarchist in disguise at area #5, you can ask Ei-Vene for her Embalming Room Key. She'll hand it over without question, which will earn you yet another 250 experience points.
Just below Ei-Vene, you'll run into a zombie marked with the number "506". The zombie has extensive stitching, which can be cut and unraveled using your scalpel. This will get you 100 experience points and a
Needle and Thread. It will also reveal that the zombie has a second designation as number "78".
If you continue southwest from zombie #506, you'll find another zombie that is suffering from some sort of tomb rot. If you try to help the zombie whatsoever, its knee will give way and it will collapse into a disgusting heap onto the floor. Its left arm will be intact, though, which you can grab and use as a crushing weapon called
Left Arm #985.
5 - Zombie Worker #821
If you ask the zombie in this room if there is anything going on, it will actually respond to you. If you question the zombie, you'll learn that he's actually an Anarchist that was sent to spy on the Dustmen. If you quiz him about the zombie disguise he's wearing, you can actually convince him to disguise
you as a zombie as well. If you bring him the Embalming Fluid and Needle and Thread necessary for the disguise, you'll earn 500 experience points.
You can also ask the zombie about a way out of the Mortuary. He will mention a portal that can be opened, but will ask that you get a key from Ei-Vene at area #4 for him before he'll tell you the specifics about the portal. Once you've obtained the key from Ei-Vene, return it to the Anarchist to receive 250 experience points and details on how to use the portal at area #4 on
the first floor of the Mortuary.
The zombie-in-disguise will explain that you need a crooked finger bone to activate the portal, and you can earn another 250 experience points if you quiz him on exactly where to find the finger bone. Apparently there is a storage room on the third floor that might house such an item.
It should also be noted that the disguised zombie can be threatened to get the information about the portal, though this will shift the Nameless One's alignment in an evil direction. You can also shift your alignment toward evil if you vow to the zombie that you will not reveal his disguise to the Dustmen, then double-cross him by exposing him to Dhall or Soego.
If you're looking for the path of least resistance, you can actually lie to the disguised zombie and tell him that you've come here looking for him to relieve him of his duties and take his place. This will earn you 500 experience points, along with all of his possessions (a
Jar of Embalming Fluid, a
Needle and Thread, three
Bandages, and a
Knife) and the information you need to activate the portal on the first floor.
6 - Loot and Exit
Search the tables in this room to uncover two
Jars of Embalming Fluid, a set of
Bandages, and the Ancient Copper Earring. The earring won't make much sense until you speak with one of the zombies upstairs, so use the exit in this room to head up to
the third floor of the Mortuary.


