 Did we miss anything in this section? Is there something we didn't discover?
Let us know!
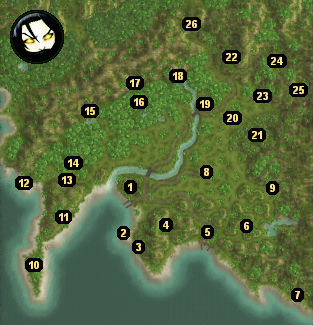
Overview
1 - Samargol
Did we miss anything in this section? Is there something we didn't discover?
Let us know!
Overview
1 - Samargol
This is the main town for Act I. You'll trigger a bunch of quests inside, including almost all of the main quests for the act, and you'll also meet some shopkeepers and potential companions. See the quest entry for
Into Samargol for more information on this location.
2 - Shipwreck (Omgar's Teeth)
The Shipwreck is involved in the quests
Surviving the Wreck,
Job Application,
Unnerving Evidence, and
Unaccounted For.
3 - Stone Knives Tribe
This location is involved in the quest
Missing Personnel.
4 - Underdark Black Market
The Black Market is an underground shopping center run by mindflayers. You'll be able to buy some nice things from the mindflayers, including traps and poisons, but you'll have to complete the quest
For Special Customers Only before you'll be able to see their quality stock.
The Black Market is also involved in the quests
Pretty Bird and
The Finest Wine. Plus, you'll meet some deep gnome prisoners in the back of the market, and you'll be able to rescue them. There isn't any way to purchase the prisoners; instead, you'll have to kill all of the mindflayers to free them. The mindflayers can be tough, but if you manage to defeat them, then you'll find some nice equipment (including a Greatsword +2, a Composite Longbow +2, and an Amulet of Will +3), you'll earn 1000 xp, and you'll gain access to a companion named Chir Darkflame.
5 - Rassatan
Inside Rassatan's tavern, you'll meet Redfeyer, who will give you the quest
The Singing Pendant.
6 - Singing Caverns
This location is involved in the quest
The Singing Pendant.
7 - Cabin
Inside the cabin you'll find a locked and trapped chest containing some minor treasures, and a bookcase containing a journal. If you read the journal then you'll learn about the brothers who used to live in the cabin, but the information won't lead to anything.
Note: The only way to reach the cabin is to follow the coast from Rassatan (#5).
8 - Nimbre
When you enter the town, you'll witness a Samarachan Patrol preparing to arrest several citizens because they've been accused of collaborating with the yuan-ti. You'll have three options for how to deal with the situation:
You can attack the soldiers. The villagers will run away, but you'll find
Gilded Armor, a
Longsword +1, and a
Periapt of Wisdom +2 on the corpses.
You can let the soldiers arrest the villagers. Then they'll both leave and you won't see them again.
You can talk to the soldiers but choose one of the "farewell" dialogue options (to avoid forcing the issue) or not talk to the soldiers at all, and then investigate the matter. Unfortunately, even with version 1.23, this option is broken, but a
fan-made patch exists to fix it. If you install the patch, then you'll just need to enter the loremaster's house and talk to him. With a high enough spot skill, you'll recognize the snake tattoos on his arm, which will cause the loremaster and two snaketongue cultists to attack you. After the battle, you'll find some good loot on the corpses -- a
Cloak of Fortification +1, a
Snaketongue Ring,
Studded Leather Armor +1, and
Boots of Reflexes +2 -- plus a
Blood-Spattered Scroll. If you take the scroll to the Samarachan Captain, then the soldiers will leave and the villagers will go free, and you'll earn 700 xp.
Also in the town you'll meet a merchant, who will sell you some basic items, and a boar farmer. If you examine the farmer's boars, then you'll notice an inquisitive pig nosing at a dirt mound. With enough skill in sleight of hand or intimidate, you'll be able to collect a
Periapt of Wisdom +2 from the mound without the boars reacting. Otherwise, the boars will attack you (which isn't necessarily a bad thing given the scarcity of
Boar Teeth). You can also loot a
Drum of Haunting, an
Emerald, and more from a locked chest in the loremaster's house.
9 - Cave
You'll face off against some goblins and ogres in the cave. In the back of the cave you'll find a trapped chest containing a
Kama +1.
10 - Ruins
You'll encounter a handful of lizardfolk warriors in the ruins. If you kill them, then you'll find some gems in a locked and trapped chest. You'll also find an Arcane Nexus here (which you won't be able to do anything with until Act II).
11 - Cave
You'll encounter a bunch of kobold warriors and wolves in this cave. In one of the chambers of the cave you'll find a locked and trapped chest containing some potions.
12 - Crypt
Inside the crypt you'll find a sarcophagus containing
Ancient Trap Parts, gems, and gold. But when you loot the sarcophagus, the skeleton and zombie "statues" surrounding it will animate, and you'll have to kill them. The door to the crypt will also close and lock, and you'll have to pick it or bash it open to escape.
13 - Chokemist Cave
This cave is involved in the quest
Sabotage.
14 - Tower
You'll encounter a few bugbear warriors in the tower. When you loot their corpses, you'll find a
Warmace +1 and more.
15 - Lantanese Lumber Camp
You'll find a portal in the camp. It won't be working when you first arrive, but it's what you'll use to travel to the Sword Coast for Act II. You'll also meet some gnomes in the camp, and they'll give you a few quests, including
Local Troubles and
Infestation. See the quest entry for
Seeking the Truth for more information on the location.
16 - Ruined Temple
See the quest entry for
Relic of the Shattered Spear for more information on the temple. You'll also need to visit this location for the quest
Sightseeing.
17 - Shattered Spear Tribe
See the quest entry for
Relic of the Shattered Spear for more information on the tribe. You'll also need to visit this location for the quest
Batiri Bargain.
18 - Waterfall Cave
You'll encounter a fell troll in this cave. If you can defeat it, then you'll find an
Amulet of Natural Armor +3, a
Ring of Protection +3, some high quality gems, and more on its corpse.
19 - Taruin
You'll receive the quest
The Finest Wine from Ottelmar in the Taruin tavern.
20 - Crypt
You'll discover two sarcophagi in the crypt, and inside you'll find a
Wand of Frost, a
Chain Shirt +1, a
Noble's Cap, a
Ring of Insight, a
Scimitar +2, and more. However, when you loot the sarcophagi, some wraiths will appear and attack you.
21 - Tempest's Fury
The tower here is involved in the quest
For Special Customers Only.
22 - Mine
Inside the mine you'll find some shadows to kill and some gems to loot.
23 - Cave
You'll encounter some firenewts in the cave, but they won't drop anything of consequence.
24 - Torich
Essien in Torich's tavern will give you the quest
Into the Salt Mines.
25 - Mines of Selgol
This location is involved in the quest
Into the Salt Mines.
26 - Viper Temple
You won't be able to enter the Viper Temple until Act III.
Somewhere near the Viper Temple, you should run into One of Many, an evil character from
Mask of the Betrayer. If you have an evil character in your party, then you'll be able to feed your companions to One of Many. Each companion will earn you 250 xp per level, so if you have plenty of cash, it's a good idea to advance your companions at the adventurer's guild in Crossroad Keep before sacrificing them. After three, seven and eleven companions, the evil characters in your party will gain an evil aura, which will give them a bonus to their attributes.
After you've sacrificed eleven companions, One of Many will attack you. You can also attack him at any time. You'll probably need to wait until you're level 15 or so to beat him. When you fight One of Many, it's a good idea to keep your spellcasters far away from him while your melee characters and summoned creatures distract him, so your casters can pelt him with spells until he dies. When One of Many dies, he'll either drop a
Talisman of Pure Evil or
The Imarskarcana.


