Did we miss anything during this quest? Is there something we didn't discover? Let us know!
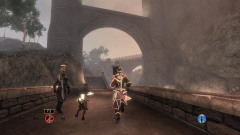
Upon arriving at Ravenscar Keep, you'll receive a brief introduction from Commander Milton about the Keep. Follow your way up a little bit, but before climbing the stairs to dry land, turn left, open the rusty metal gate near some crates, and head forward to find a
Traitor's Keep Diary written by one General Turner. The Traitor's Keep Diaries are collectables similar to Fable III's
Rare Books, but they provide some backstory on the events at the Keep. Double back through the gate and head up the stairs, where soon you'll hear a loud explosion. Run forward, across the bridge for a nice view of the Keep, and continue up another set of stairs.
When you reach the main gate, you'll find it's been barricaded. Apparently there was a break-out in the Keep just moments ago, so it's up to you to put an end to the prisoners' escape attempt. The main way in is inaccessible, but Commander Milton knows of a secret entrance, so follow him, vault down to the creek below, and enter through the sewers (there's a dive spot right where you hop down). Continue to follow him, pass through the gate he opens, and you'll soon find yourself within the Ravenscar Keep proper.
 |
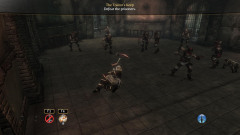
Once inside, you'll be in "The Pit," the worst part of the Keep, with the most insane of inmates. Milton will speak about General Turner and speculate that he's behind the break-out. Run back down the hall just a little bit for a dig spot upon first entering, then follow Milton and you'll find yourself inside what Milton fittingly refers to as the "torture chamber." Proceed onward through another wing of The Pit and you'll find yourself fighting a wave of escaped prisoners. These guys aren't very tough, less so than even regular Mercenaries, so you should have little trouble, especially with Milton backing you up.
Once the prisoners lay dead, climb up the stairs to the infirmary. Milton will speak some poignant words, then lead you forward. You'll soon find yourself in one of the cell blocks, with prisoners fighting some of the Keep's guards. Thankfully, the prisoners are preoccupied, so you can stand back and take some pot shots with your favourite gun or spell to deal with them easily. Once all the inmates have been sent to the Great Big Prison in the Sky, climb up the stairs to the second level and follow the catwalk around. You'll fight some more prisoners, these ones armed and dangerous, so exercise a little bit more caution.
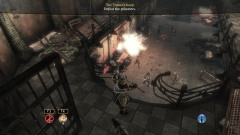 |
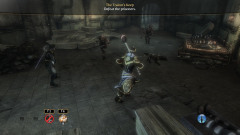
Pressing forward, you'll find yourself overlooking another cell block. Either jump down and join the fray, or snipe from a distance. Either way you'll have to get down there eventually, and when you do more prisoners will escape from their cells. Another wave will arrive mid-fight, so cut them down, and then follow Milton forward. He's now just about convinced General Turner is behind the escape attempt, and wants to cut him off before he can leave.
Head forward and you'll find yourself in a small room with several very dangerous prisoners. This will probably be the toughest fight in retaking the Keep, but it's also the last, so buckle down and get to work. When they're all disposed of, you'll learn that three important prisoners, including Professor Faraday, "Witchcraft Mary" Godwin, and the aforementioned General Turner, have escaped from Ravenscar Keep and are likely at large in Albion.
Thus begins your mission for the remainder of the Traitor's Keep story: travel to the likely hideaways of the remaining prisoners, and bring them back where they belong! Although you can explore Ravenscar's interior and exterior, you may want to wait a little bit as the Keep won't be ready to fully explore until you've finished the Traitor's Keep storyline. When you're ready to proceed, head back to the docks and board the ship with Commander Milton to
set sail to Clockwork Island.