 Did we miss anything in this section? Is there something we didn't discover?
Let us know!
Enemies
Did we miss anything in this section? Is there something we didn't discover?
Let us know!
Enemies
- Lava Slags (Level 1, 3)
- Mutated Assassin Stalks (Level 2, 3)
- Rift Harpies (Level 1)
- Scarlet Deaths (Level 2, 3)
Notable Loot
Secrets
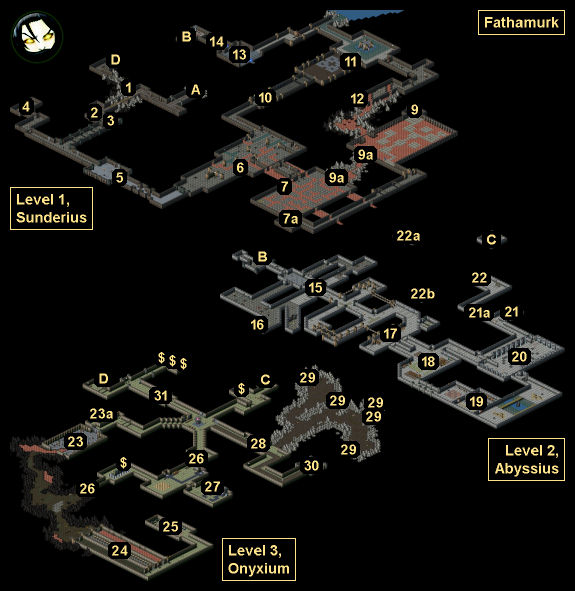
Annotations
1 - Secret Door
This door will only open after you've used the teleporter to exit Fathamurk (Exit D).
2 - Gate
This gate will close after you've gone through it, locking you inside Fathamurk. At the same time, you'll receive the side quest
Escape from Fathamurk.
3 - Sack
You'll discover a sack next to a skeleton here. Inside the sack you'll find an
Old Journal and some
Candecium Dust. The
Old Journal will give you some background information about Fathamurk, but it's not useful for anything, so after reading it you can put it right back in the sack. You'll need the
Candecium Dust to open a door on Level 2 (#21).
4 - Powder Kegs
You'll find two
Powder Kegs here.
5 - Trapped Gate
If you step onto the pressure plate in the gate, then you'll die. To defeat this trap, you'll need to place a
Powder Keg (#4) onto the pressure plate and then pull the lever in the center of the room. This will close the gate and cause the
Powder Keg to blow up, destroying the gate and the trap.
6 - Sack
Inside the sack here you'll find
Journal Page 3.
7 - Lever and Gates
When you pull the lever here (#7), you'll open the gates to the south (#7a).
8 - Lava Slags
One of the Lava Slags in this room will drop
Candecium Dust.
9 - Lever and Gates
When you pull the lever here (#9), you'll open three gates to the south (#9a), which will grant you access to more Lava Slags. One of the slags will drop a
Diamond Key, which will allow you to open up a door to the west (#10).
10 - Locked Door
The only way to get this door open is to use the
Diamond Key (#9) on it. Next to the door you'll find a sack containing
Journal Page 5.
11 - Sack
Inside the sack here you'll find
Journal Page 14.
12 - Chests
You'll find two chests here. One is random, but in the other you'll find a
Healing Elixir III and a
Mana Potion III.
13 - Levers
You'll need to pull the levers in this room to open up the gate leading to the lightning hallway (#14), and also to remove some of the lightning traps.
14 - Lightning Hallway
If you look at the hallway closely (which is difficult to do given that the wall is blocking your view), then you might notice that there's a safe path through the lightning traps. Starting in the center, you should go forward, diagonal right, diagonal left (x2), diagonal right (x2), forward, diagonal left, and then diagonal right. If your resistance to elements is high enough, then you can also just walk through the hallway and not take much if any damage.
15 - Pressure Plates and Gates
In this part of the level, you'll find two pressure plates (impossible to see because of the walls) and four gates. In order to open the gates, you'll need to step onto each of the pressure plates, which will require you to fight your way through some Mutated Assassin Stalks. You'll know if you've stepped onto a pressure plate because a nearby light will change from red to green.
16 - Treasure Chest
Inside this treasure chest you'll find
Divine Ore Plate Boots and
Candecium Dust.
17 - Tables
You'll discover six tables here. On one you'll find
Journal Page 19. On the others you'll find four bits of
Candecium Dust.
18 - Treasure Chests
In this room you'll discover six treasure chests. Five of them will always be empty, but in the sixth you'll find some
Candecium Dust.
19 - Levers and Treasure Room
In this part of the level, you'll find six levers and a locked treasure room. To get into the treasure room, you'll need to move the levers to the correct position. The trick for this is to notice the rings on the wall in the treasure room. The levers in line with the rings should be pointing towards the treasure room; the others should be pointing away from the treasure room. That is, from left to right the levers should be pointing towards, away, towards, towards, away and away.
Inside the treasure room, you'll find five random chests plus numerous Dragonbite traps on the floor next to them. If you're not good at Skullduggery, then you might want to remove your equipment before trying to disarm / setting off the traps.
20 - Spider Trap
When you enter this room, the gate will close behind you, locking you inside. To escape, you'll need to pull the lever on the right side. This will open the exit gates, but it will also cause a half dozen spiders (probably Scarlet Deaths) to appear and attack you. Depending on your character, you might need to run to one of the exits so you can catch the spiders in the doorway and fight them one at a time.
21 - Odd Device and Door
If you have 8 bits of
Candecium Dust (found at #3, #8, #16, #17, #18) in your possession, then clicking on this device (#21) will open the nearby gate (#21a). In between the device and the door you'll find a sack with
Journal Page 21 in it.
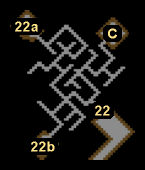
22 - Invisible Maze
|
 |
| Invisible Maze |
|
You'll find an illusory wall here (#22) with an invisible maze on the other side. Depending on your skill level in Cartography, the invisible maze might be easy or tedious. With enough points in the skill, the maze will show up on your mini-map, which will make it straightforward to see where you're going. But if you don't have enough points, then you'll either have to wing it and guess where the path is, or keep the tab key pressed, which will cause valid walking squares to have a green border, or use the insert shown to the right.
Regardless, you should make your way to the middle room (#22a), where you'll find a lever and a random treasure chest. Pulling the lever will open the gate into the left room (#22b), where you'll find another lever and another random chest. Pulling the second lever will open the gate to the final room, where you'll find the stairs leading down to Level 3 (Exit C).
Note: By the entrance to the maze (#22), you'll find seven
Torches (three on the walls and four in barrels). So if you've run out of
Torches during your stay in Fathamurk, you'll be able to replenish your supply.
23 - Blasting Charge Storage
To enter this room (#23), you'll need to pull the lever located nearby (#23a). However, when you go inside, the gate will close behind you, and you'll find yourself in a room with dozens of
Powder Kegs and a handful of Lava Slags. For best results, you should run through the room to the passage on the other side, and fight the Lava Slags there. Otherwise, when the Lava Slags blow up, they'll start a chain reaction of explosions and waste most if not all of the
Powder Kegs -- and possibly kill you. One of the Lava Slags will drop
Candecium Dust when it dies.
24 - Three Paths
At this spot you'll have to choose one of three paths to reach the treasure room beyond (#25). For one path you'll have to cross lava, in another you'll have to walk through clouds of poison, and in the third you'll have to defeat a dozen Mutated Assassin Stalks. If your resistances are good enough, then one of the first two paths might be easiest for you, but the third path is the only one that will award you xp for completing it (since Mutated Assassin Stalk are worth 185 xp each), and so that's the one you should try and use.
25 - Treasure Room
Inside this treasure room you'll discover seven chests. Four of them will always random (or empty), but in the others you'll find six bits of
Candecium Dust, a
Large Ruby, and some gp.
26 - Closed Gates
For both of these gates, you'll only be able to open them by pulling the lever on the southern side. That is, you'll have to go through Blasting Charge Storage (#23) to get to them.
27 - Cabinet
Inside this cabinet you'll find some
Candecium Dust.
28 - Odd Device
If you have 8 bits of
Candecium Dust (found at #23, #25, #27) in your possession, then clicking on the odd device here will remove the nearby gate.
29 - Hidden Caches
With high enough skill level in Spot Hidden, you'll discover several secret caches in the caverns on Level 3. If you loot all of them, then you'll find 1
Large Diamond, 3
Large Emeralds, and 1
Large Ruby.
30 - Stone Golem
The Stone Golem is the toughest boss in the game. He's slow, and he only uses melee attacks, but he hits hard, he has a ton of hit points, and he can regenerate his health during the battle (when you're not close to him). Depending on your character, you'll have three options. You can use the
Plasma Wand against him (if you've completed the side quest
Assistance from Lorewitch), you can surround him with
Powder Kegs (#23) and blow him up, or, if you're powerful enough, then you can just go toe-to-toe with him, perhaps with the help of a few potions. Or you can use some combination of the three.
The
Powder Keg strategy is the most complicated, simply because the Stone Golem will recognize what
Powder Kegs can do, and he won't stand next to them or walk up to them. So you'll need to corner him somewhere and block his movements with
Powder Kegs before finally surrounding him with eight. This is easier to do if you have
Potions of Haste available to you. Eight
Powder Kegs won't necessarily kill the Stone Golem, so you might need to finish him off using other means.
Note: You can also lead the Stone Golem into the central hub of the level (where the artwork is). The two diagonal passages leading away from the hub are too narrow for the golem to enter, so you'll be able to stand in a passage and ping him with ranged attacks. Then you'll only have to worry about his regeneration and not his attacks.
When the Stone Golem dies, he'll drop a
Small Candecium Crystal, and you'll earn 1000 xp.
31 - Odd Device
If you have a
Small Candecium Crystal (from #30) in your possession, then clicking on the odd device will cause the nearby gate to disappear.
Local Exits
- Stairs up to the
Farrock Caves.
- Stairs between Level 1 and Level 2.
- Stairs between Level 2 and Level 3.
- Teleporter to Level 1. This teleporter will take you out of Fathamurk, but you won't be allowed to go back inside, so be sure to take as much loot with you as possible.


