 Did we miss anything in this section? Is there something we didn't discover?
Let us know!
Background
Did we miss anything in this section? Is there something we didn't discover?
Let us know!
Background
At the start of Act II, you'll receive a message from Arianni at your estate in
Hightown. Reading the message will trigger this quest.
Note: You'll receive the message regardless of how you completed Arianni's quest
Wayward Son in Act I.
Walkthrough
When you talk to Arianni in the
Lowtown alienage, she'll tell you that her son Feynriel has gotten trapped in the Fade, but that Keeper Marethari knows of a ritual that might free him. The only catch is that someone Feynriel respects -- that is, you -- will need to enter the Fade and convince him to return.
When Keeper Marethari shows up, she'll warn you that if Feynriel were to become an abomination, then he would be able to cause "unimaginable" destruction, and she'll ask you to kill him if you cannot pry him away from the demons in the Fade. If you reply "I understand," then you'll gain friendship points with Sebastian, and rivalry points with Anders and Merrill. If you reply "I can't do that," then you'll gain friendship points with Anders and Merrill, and rivalry points with Sebastian.
When choosing who to take with you to the Fade, there are some things you should know. Sebastian will refuse to go, so he won't be available. Of your other companions, it's guaranteed that some of them will betray you, no matter how many friendship or rivalry points you have with them:
- Anders will betray you at the demon Torpor (#5) if you try to deal with it.
- One out of Aveline and Isabela will betray you at the demon Caress (#6).
- One out of Fenris, Merrill and Varric will betray you at the demon Wryme (#7).
The good news is that when characters betray you, killing them will just remove them from the Fade and not hurt them in the real world. Better yet, when characters betray you, they'll trigger an apology quest, which you'll be able to complete for friendship or rivalry points. So you might want to plan your party so you have as few betrayals as possible (to make the battles easier) or to have as many betrayals as possible (to gain more friendship or rivalry points).
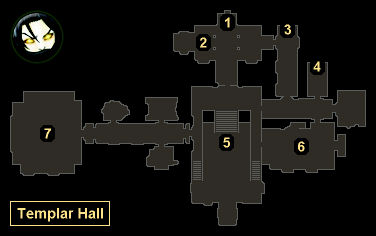
When you enter the Fade, you'll find yourself in the Templar Hall. As you explore the area, you'll pass by some optional puzzles that you can complete for attribute points (#2-4), but then you'll meet up with three demons:
- Torpor, a sloth demon (#5). It will tell you that two other demons are trying to take possession of Feynriel, but that you should help it to do so instead, since it will only use its power in the Fade and thus poses no threat to you. You'll have multiple ways to respond:
- You can attack Torpor. This will earn you friendship points with Anders, Aveline and Fenris, and rivalry points with Merrill.
- You can listen to Torpor's offer and then choose "power" (+6 attribute points), "knowledge" (+1 ability point), or "magic" (2x
Torpor's Barrier Rune) as your reward. This will earn you friendship points with Merrill, and rivalry points with Aveline and Fenris.
Note: If you don't deal with Torpor, then at the end of the quest Keeper Marethari will give you a
Tome of the Slumbering Elders (a junk item worth 70 silvers). So Torpor's reward is much better. We're not aware of any ramifications for helping Torpor, other than the disapproval of some your companions.
- If you listen to Torpor's offer with Anders in your party, then Anders will demand that you kill the demon. If you agree, then you'll gain friendship points with Anders. If instead you tell Anders to back off, then he'll attack you, and you'll gain rivalry points with him and Fenris. After dispatching Anders, when you talk to Torpor again, you'll still be able to work with it or attack it, and you'll receive the same friendship or rivalry points as shown above.
- Caress, a desire demon (#6). For this encounter, Caress will pretend to be Feynriel's father, and you'll get to play his mother. To keep Feynriel's mind intact, you should play along and select the top answers. But regardless of what you say, at the end of the conversation Feynriel will disappear, and Caress will seduce Aveline or Isabela away from you, provided that you have one of those two companions in your party. You'll then have to fight Caress plus the seduced companion (if applicable).
Note: During Isabela's betrayal conversation, if you say "I can't beat that," then you'll gain friendship points with her. If you say "Don't turn on me," then you'll gain rivalry points.
- Wryme, a pride demon (#7). For this encounter, Wryme will pretend to be Keeper Marethari, and you'll get to play First Enchanter Orsino. To keep Feynriel's mind intact, you should play along and select the top answers. But regardless of what you say, at the end of the conversation Feynriel will disappear, and Wryme will seduce Fenris, Merril or Varric away from you, provided that you have one of those three companions in your party. You'll then have to fight Wryme plus the seduced companion (if applicable).
Note: During Merrill's betrayal conversation, if you say "Don't do it, Merrill" or "Don't dare turn on me," then you'll gain rivalry points with her.
Note: If you have trouble with the battles against your companions, then you might want to unequip their weapons before they turn on you. This will make them much easier to defeat.
After dealing with Caress and Wryme, when you return to the central room (#5), one of two things will happen:
- If you made a deal with Torpor, then you'll encounter Torpor and Feynriel. If you tell Feynriel "You must wake up," or if you said the wrong things during your encounters with Caress and Wryme, then you'll break the deal with Torpor and you'll start a fight against it. Afterwards, the encounter will proceed as if you had killed Torpor earlier (see below). If instead you tell Feynriel "You're safe," and if his mind is still intact, then you'll complete the deal with Torpor and gain the reward promised, and return to the real world.
- If you killed Torpor, then you'll encounter Feynriel alone, and you'll have to make a choice. You can allow him to go to Tevinter to train his abilities, or you can kill him and turn him tranquil in the real world (depending on how you handled the encounters with Caress and Wryme, Feynriel might even ask for this). Either way, you won't see Feynriel again, and you'll return to the real world.
Back in the real world, you'll start up a conversation with Arianni and Keeper Marethari. If you made a deal with Torpor, then Anders will point this out, and admitting it will gain you friendship points with him while telling him to shut up will gain you rivalry points. If you didn't make a deal with Torpor, then Marethari will give you a
Tome of the Slumbering Elders (a junk item worth 70 silvers). Either way, Arianni won't really be happy with the outcome, and she'll disappear, but you'll still earn 1000 xp.
Note: The six apology quests are
Anders in the Fade,
Doubts That Linger,
Fenris Night Terrors,
Isabela's Apology,
Merrill, an Apology, and
Varric's Apology.
1 - Starting Point
2 - Floating Book
The book will float around in a circle, always stopping in the same places. If you put one of your characters in one of those places and then interact with the book when it arrives, then the book will fall to the floor. If you then have one of your characters interact with the book while it's on the floor, then that character will gain an attribute point.
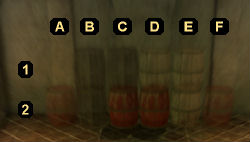
3 - First Barrel Puzzle

|
The first barrel puzzle.
|
For this puzzle, you'll need to move the four large barrels to the bottom row and the three small barrels to the top row, but you'll only be allowed to take 19 moves. If you take too many moves, then you'll fail the puzzle and get attacked by a rage demon and two shades (worth about 100 xp). If you're successful, then whichever character you use to complete the puzzle will gain an attribute point.
The shortest solution we've seen for the puzzle is 14 moves. Using the labels from the insert shown to the right, these moves are: C1, B1, B2, A2, A1, B1, B2, C2, C1, B1, B2, C2, D2, D1.
4 - Second Barrel Puzzle
|
The second barrel puzzle.
|
For this puzzle, you'll need to move the four red barrels to the center of the two rows, but you'll only be allowed to take 19 moves. If you take too many moves, then you'll fail the puzzle and get attacked by a rage demon and two shades (worth about 100 xp). If you're successful, then whichever character you use to complete the puzzle will gain two attribute points.
The shortest solution we've seen for this puzzle is 16 moves. Using the labels from the insert shown to the right, these moves are: B1, B2, A2, A1, B1, C1, C2, B2, E1, E2, F2, F1, E1, D1,D2, E1.
5 - Torpor
6 - Caress
7 - Wryme


