 Did we miss anything in this location? Is there something we didn't discover? Let us know!
1 - Elder Ankhumar
Did we miss anything in this location? Is there something we didn't discover? Let us know!
1 - Elder Ankhumar
The elder will tell you that you're on the summoning level of the academy, and that you'll have to pass three tests before moving on to the next level. He'll also mention drugs, and that you should visit the Priestess (#3) before attempting the tests.
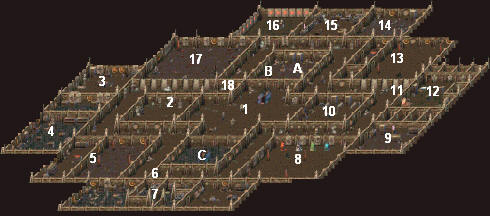
2 - Map Stone
If you click on the stone, you can have most of the rooms in the level labeled on your map.
3 - Priestess' Room
In this room you'll meet Rakoham, Priestess of Raan. If you ask her about Raan, she'll let you know that Raan is the goddess of wisdom, war, and honor. Also in the room you should find a statue dedicated to Raan. When you click on the statue, it will ask you the principles of Raan (wisdom, war, and honor). If you answer correctly, the statue will give you Raan's blessing, you'll receive 35,904 experience, and the statue will turn into a container with the unique amulet
Raan's Blessing inside. If you answer incorrectly, you'll receive 35,904 experience, and the priestess will give you the blessing anyway.
4 - Markunthar's Laboratory
This room starts out locked. Later, after you've learned that you'll need a
feynur potion and that Markunthar has one, two things will happen: his door will open, and a Raanaar named Dojuram will appear next to it. If you tell Dojuram to praise Markunthar's intelligence, then she'll entice Markunthar out of his laboratory, allowing you to search it.
Inside the lab, you'll find some things of interest. In a book you'll discover a
golden key. The key unlocks one of the two locked "closets" on the western side of the room. In the closet you'll find a ring and a
sapphire key. The
sapphire key unlocks the other locked closet, and inside that closet you'll find the
feynur potion and a skillbook for "alchemy" and "wizard / elemental" skills.
Note: If you don't figure out the bit with Dojuram, then you can attack Markunthar, and he'll drop the
sapphire key when he dies.
Also in the room, just visible on the northern wall, you should see a red button. If you drag away the shelf in front of the button, then you should see that there are really four buttons, and that they're colored blue, yellow, green and red. These buttons represent Marfeyam's riddle, which Bexhanar in the academy store (#15) might have asked you to solve.
To solve the riddle, you just have to press the buttons in the correct order. There are only 24 combinations, so if you're patient you can find the order through trial and error. But the room also contains a hint for you. On the western side, behind a closet, you can find four piles of potions (you can drag the closet out of the way to see the potions more clearly). There are three
medium mana potions (blue), four
medium stamina potions (yellow), two
medium constitution potions (green), and one
medium healing potion (red). That is, you should press the buttons in the order red, green, blue, and then yellow. When you do that you'll earn 67,584 experience.
Pressing the buttons in the correct order will open up the room north of the laboratory. There you'll find four closets, each one with a symbol behind it. The symbols are the same as the ones you can find in the Rune Room (#16), so if you haven't been there yet you should check it out. From left to right the symbols represent fire (red), lightning (yellow), frost (blue), and poison (green). So when you click on the closets, and the game asks you for a color, choose the color of the associated symbol. You'll receive a
permanent healing potion, a
permanent stamina potion, a
permanent mana potion, and a
permanent constitution potion.
Finally, the "permanent rocks" in the main laboratory room don't seem to do anything.
5 - First Summoning Hall
In the entry room, the instructor will tell you to "summon an informer" so you can learn about the mushroom Quetzacellona. He'll then tell you to go to the library (#7) to learn more about summoning. Finally, he'll give you a
key so you can unlock the door at #6 and reach the library.
In the library you'll learn that the informer you'll need to summon is an imp; that you'll need the following components:
feynur potion,
kohar root and
spider leg; and that you'll need the
wisdom rune. Visit the Component Clerk (#9) to learn about the components, and then go to the Rune Room (#16) to get the rune.
If you've collected everything you need, you should earn 88,704 experience when you re-enter the entry room. (If you have everything, but you don't get any experience, you might need to go back out into the hall, drop everything and then pick it back up.) Inside the summoning room, you should talk to the instructor (who will take the
wisdom rune), place the three components inside the circle of skulls, and then click on the book. An imp will appear, and you'll pass the test, opening the way to take the second test (#8).
6 - Locked Door
The instructor in the First Summoning Hall (#5) should give you the key to this door the first time you talk to him.
7 - Library
In the entry room, speak to Elder Antopar the librarian. If you ask him for a book about summoning, he'll tell you to enter the library, and the door leading to the main part of the library will become unlocked. If you ask the elder about drugs, he'll tell you to read the book
Dangers of Drug Addiction. However, this book doesn't seem to exist.
You'll find the books you need in the western part of the library. One book is
Mycology: The Science of Mushrooms. The purpose of this book is just to let you know what "mycology" means. The second book is the
Book of Basic Summoning. You won't find "mushroom" or "quetzacellona" in this book, but you will find an entry for "mycology," which is what you want. The entry should let you know that you'll need an imp informer; that you'll need the following components:
feynur potion,
kohar root and
spider leg; and that you'll need the wisdom protection rune. This is useful information to write down.
When you exit the western part of the library, the deathknight will quiz you to see if you've understood what you read in the summoning book. If you answer his question correctly (imp), you'll receive 67,584 experience. Otherwise he'll just tell you the answer and what "mycology" means.
8 - Second Summoning Hall
The door to the summoning hall starts out locked. It will only open after you've completed the first summoning test.
Inside you'll meet another summoning instructor. He'll tell you that he needs proof that you know about "monsters and their attacks." This sort of information can be found in a book, but when you go to the library (#6), the librarian will tell you that Elder Ansukar (#14) checked out the book and never returned it. Then when you see Elder Ansukar, he'll tell you that he gave the book to Belehram, the component clerk (#9). Belehram, in turn, will say she gave the book to her son Dolehar (#11). Dolehar will lie and say he's never seen the book.
The next part of the quest is a little random. In (or near) the Component Clerk room (#9) you should see a student named Dotharhar. He'll tell you that he saw somebody trying to sell the book, and that he also saw the person talking to an imp, but he won't tell you who the person was. To find out, visit Bexhanar the academy merchant (#15). He'll remember Dolehar trying to sell the book to him.
Since you're looking for an imp, you should next seek out Nixfix in the Maintenance Tunnels. Nixfix will say Hoxplox has the book now, but that it's too dangerous to look for him. However, if you then talk to Taxlehix, he'll mention that Hoxplox has the book, and that Hoxplox made the drugs for Nixfix to sell, and he'll give you the key to the door to the west, allowing you to go down into the Lower Tunnels.
In the Lower Tunnels, you'll find Hoxplox's corpse in the southeastern corner, and the book
Strategic Summoning will be on the corpse. The book simply tells the attack types for different creatures.
When you return to the summoning hall, the instructor will accept the book as proof of your knowledge. He'll then tell you to click on the book in the room to begin the test.
The test is pretty simple. Each time you click on the book, an elemental creature and four shrines will appear. You can then click on one of the shrines to receive an "extra large" crystal for the shrine type. From left to right the shrines protect against fire, air, poison, and water. The idea is to click on the shrine that will protect you the best against the elemental's attacks, but the elementals are only around level 30, and so you can probably kill them easily even without the shrines. However, you should still click on the shrines just so you can grab the "extra large" crystals they produce. Each shrine produces at most one crystal.
The test will end after you've defeated four elementals. Somewhat confusingly, the game won't tell you that you've completed the test -- the instructor, for example, will simply disappear -- but you'll still be able to move on to the third test (see #13).
9 - Component Clerk
Here you'll meet Belehram, who is in charge of the academy's components. Here's what he'll say about the three components you need:
Feynur potion: A mage named Markunthar has one, but he never shares.
Kohar root: Imps were supposed to have delivered it, but they haven't. See Nixfix in the Maintenance Tunnels for this component.
Spider leg: You can get one in the room of specimens (#12).
After speaking to Belehram, you'll witness a pair of Raanaar ghosts having a conversation. They'll talk about Markunthar, how he doesn't like wine or poetry, but how praising his intelligence might do the trick. After this conversation, Dojuram will appear next to Markunthar's Laboratory (#4), and the door to the laboratory will become unlocked. Then simply tell Dojuram to praise Markunthar's intelligence, and she'll get him out of the room, allowing you to pick up the
feynur potion.
10 - Sleeping Quarters
On a table here you'll find a diary. The diary clearly states the student's need for drugs, and it mentions "that little dealer."
Also in the room you should find a silver chest. It is part of a sequence of chests that begins on Academy Level 4.
11 - Dolehar
Dolehar will warn you about going into the Component Storage Room (#12), but then he'll offer to sell you the key to the room for 500 gold. You'll need the key to get in, so go ahead and buy it. If you ask Dolehar about drugs, he'll claim that he doesn't know anything about them, but then he'll seem a little too interested in if you have any.
12 - Component Storage Room
The room starts out locked. You'll have to buy the key from Dolehar (#11) to get in.
Inside the room you'll have to fight some "component creatures," and one should drop the
spider leg you'll need for the first summoning test. Also in the room, in the southeastern corner, you should find a
platinum key. It unlocks a door on the northern side of the room, and beyond it you can pick up a couple potions.
13 - Third Summoning Hall
The door to the summoning hall starts out locked. It will only open after you've completed the second summoning test.
This third summoning test is the most straightforward. The instructor will simply tell you to read the book in the summoning hall. However, when you do that Samuel will appear and realize where you are. Oops.
There are two ways to defeat Samuel here. One way is to lead Samuel out of the circle of skulls. Unfortunately, the encounter is a little buggy, and Samuel doesn't start in the circle like he should. That means you'll have to lead him into the circle first, and then lead him out. At that point he'll just disappear. The other way to defeat Samuel is to fight him. He's level 41 and is tough to kill, but maybe you've been collecting more potions than you know what to do with, and have been looking for a place to use them. Either way you defeat Samuel will net you 88,704 + 25,344 experience.
Defeating Samuel will also complete the third summoning test for you, and the instructor will tell you that you can now move on to Academy Level 3 (through Exit C). The instructor will also claim that you won't be able to come back down to Academy Level 2, but that's false.
14 - Ansukar's Room
Elder Ansukar is the Raanaar tasked with finding out who is selling drugs to the students of the academy, and he'll ask for you to help. Lots of people in the academy will comment about the drugs, and most will directly or indirectly point at Dolehar (#11). However, nothing will happen on this level of the academy. You'll solve this quest when you find Hoxplox in the Lower Tunnels (which you'll get to during the second summoning quest).
Also in the room, in a closet on the western side, you'll find a
bronze key. The key unlocks the door at #18.
15 - Academy Store
If you ask Bexhanar the merchant about riddles, he'll ask you to investigate Marfeyam's riddle in Markunthar's Laboratory (#4). The riddle involves reaching the secret room north of the laboratory (see the laboratory entry for details). Bexhanar won't give you a reward for this. The reward is in the secret room.
16 - Rune Room
Inside the rune room, you'll find 12 runes on the walls. Each time you touch a rune, you'll be transported into a room with a "rune monster" in it. When the monster dies, it will drop a rune, and when you pick up the rune, you'll be transported back to the Rune Room (so loot the room first, if you can).
If you number the runes from left to right, then in the 7th rune you'll be able to rescue the Rune Keeper (for no apparent reward). In the 8th rune you'll be able to pick up the (level 3)
battlefield magical key. In the 10th rune you'll be able to loot the
Ring of Raan. And in the 11th rune you can find the
wisdom rune. The
wisdom rune is what you'll need for the first summoning test.
17 - Training Room
The training room starts out locked, but if you talk to Xepatar outside the room and agree to kill the demons inside the room, he'll open the door for you. Inside you'll have to kill three level 28 demons, but you'll receive 67,584 experience after killing the third one. You can also find a
Raanaar skeleton summoning doll in the northwestern corner of the room.
18 - Locked Door
You can find the key to the door in Elder Ansukar's Room (#14).
Exits:
A. Portal to Academy Level 1.
B. Rope to the Maintenance Tunnels.
C. Stairs to Academy Level 3. Elder Ankhumar will unlock the door to the exit after you've completed the three summoning tests in the level.


