 Did we miss anything on this map? Is there something we didn't discover? Let us know!
1 - Arrival
Did we miss anything on this map? Is there something we didn't discover? Let us know!
1 - Arrival
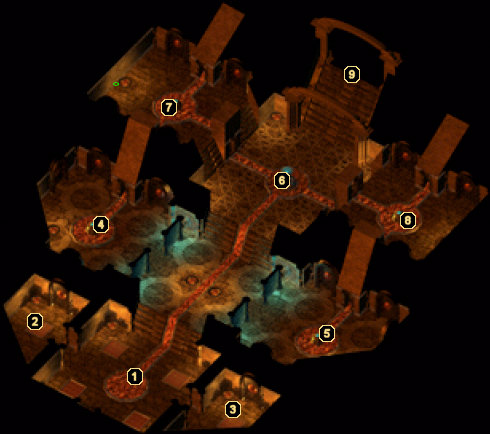
When you initially enter Yaga-Shura's lair from the Marching Mountains, you'll be confronted by a couple of Fire Giants. Be careful where you step within this place, as the streams of lava will damage your party.
2 - Hammer Symbol
On the wall of this room is the symbol of a hammer. If you have the Hammer Wardstone from area #7, you can click on the symbol here to remove the force field barring your way into area #4.
3 - Skull Symbol
On the wall of this room is the symbol of a skull. If you have the Skull Wardstone from area #8, you can click on the symbol here to remove the force field barring your way into area #5.
4 - Flame Wardstone
Once you've removed the force field by using the Hammer Wardstone at area #2, you can enter this room. You'll first have to contend with some fire-dwelling creatures before you can search the container in the middle of the room. Once you've dispatched all enemies, search the container to find some treasure (including the
Girdle of Fire Giant Strength) and the Flame Wardstone, which you'll need for area #6.
5 - Blood Wardstone
Once you've removed the force field by using the Skull Wardstone at area #3, you can enter this room. You'll first have to contend with some fire-dwelling creatures before you can search the container in the middle of the room. Once you've dispatched all enemies, search the container to find some treasure (including
Psion's Blade +5) and the Blood Wardstone, which you'll need for area #6.
6 - Wardstone Machine
Here you'll find a strange machine nestled within the lava. If you have the Flame and Blood Wardstones from areas #4 and #5, you can use them on the machine to open the staircase to the second floor.
7 - Hammer Wardstone
A moderately difficult fight will await you in this room. Take out any resistance and then search the container in the middle of the room to find the Hammer Wardstone, which you'll need for area #2.
8 - Skull Wardstone
A moderately difficult fight will await you in this room. Take out any resistance and then search the container in the middle of the room to find the Skull Wardstone, which you'll need for area #3.
9 - Exit to Second Floor
Once you have placed the Flame and Blood Wardstones into the machine at area #6, you'll be allowed to ascend the stairs here to the second floor.


