 Did we miss anything in this location? Is there something we didn't discover? Let us know!
Overview
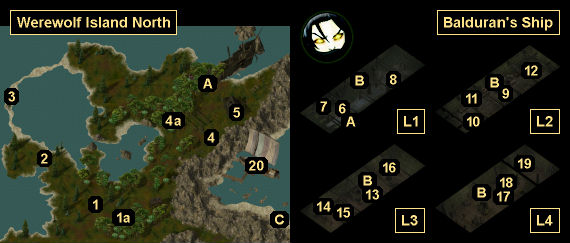
In this part of the island, you'll encounter a lot of wolfweres. They're tough opponents. They hit hard, and they're resistant to magic. For best results, you should focus on one at a time to reduce their numbers as quickly as possible. You should also be very careful to block them with your melee fighters to keep them away from your casters. But here's the good news: wolfweres are worth 1400 xp each, so if you get to where you can handle them easily, then you can grind a good amount of experience here (since wolfweres will frequently appear when you try to rest).
1 - Palin
When you approach this spot (#1), Palin will tell you that monsters are attacking some people nearby. If you follow him, then he'll lead you to an ambush (#1a) where you'll get attacked by four wolfweres. If you don't follow Palin, then he'll call the wolfweres to him, so you'll have to fight either way.
To make the fight a little easier, you should stop when Palin turns hostile and then retreat. This should cause only Palin to follow you, and so you can break up the battle into two parts. You'll earn 7400 xp for defeating the ambush, and you'll find Farthing's Dolly on Palin's corpse. You'll need the dolly for Farthing's quest in
Werewolf Island South.
2 - Meym
Around here Meym will come up to you and ask you who you are. If you're insulting to him or wolfweres in general, then he'll switch to a wolfwere and attack you. Otherwise, he'll leave you for Karoug (#17). If you kill Meym (either by defending yourself or force-attacking him), then you'll earn 1400 xp.
3 - Sirine Queen
When you approach the Sirine Queen here, she'll start a conversation with you. If you're polite to her, and if you believe that's she's an innocent victim defending herself against "monster" fishermen, then she'll give you Evan's Body, and you'll earn 2000 xp. But if you don't believe her story, or if you just want a tougher (and more rewarding) encounter, then you can fight her plus four other sirines.
Sirines, of course, are tough and annoying opponents, but the set-up here is very friendly. You'll first face the queen all alone, so you should be able to prevent her from casting anything (she's tough to hit with physical attacks, but simple spells like Magic Missile will do the trick). Then you'll face her four sirine guards in pairs of two: two to the north and two more to the south, and you should be able to kill them easily while they're messing around with theirImproved Invisibility spells.
For defeating the queen and her guards, you'll earn 14,000 xp, and you'll find over 50
Arrows of Biting, a half dozen Pearls, and Evan's Body on the corpses. You'll need Evan's Body for Evalt's quest in
Werewolf Island South.
4 - Kryla
Around here (#4) you'll meet Kryla. She'll tell you that some wolfweres killed her husband Jondal, and she'll ask you to avenge him. If you agree to help, then Kryla will lead you to the west (#4a) where -- you guessed it -- she and Jondal will ambush you. If you tell Kryla to get lost, then she'll head over to Jondal, and they'll attack you the next time you wander by. You'll earn 2900 xp for defeating them.
5 - Dradeel's Cabin
Inside this cabin you'll meet Dradeel, who was Balduran's guide long ago. He'll tell you how Balduran sailed his ship to this island, and how half his crew suddenly turned into lycanthropes, killing the rest -- except for Dradeel, who managed to escape.
Dradeel will then ask you for help. He'll tell you that his spellbook is on board Balduran's ship, and he'll ask you to retrieve it. In exchange, he'll give you a
Wolfsbane Charm, so you'll have an easier time defeating the wolfweres that you'll encounter inside.
You'll find Dradeel's Spellbook on the top level of the ship (#18). When you return it to Dradeel, he'll simply teleport away, but you'll still earn 5000 xp.
Note: Apparently in the original game, you could pickpocket Dradeel for a second
Wolfsbane Charm, but this was fixed in the EE.
Also in Dradeel's cabin, you can loot a locked chest containing Belladonna Flowers, a Holy Cloak, a
Staff Mace +2, and 210 gp. Dradeel won't care if you take these items. You'll need the flowers and the cloak for Delainy's / Durlyle's quests in
Werewolf Island South.
6 - Wolf Battle
When you enter Level 1 of Balduran's ship, you'll immediately get attacked by a large collection of wolves, including dire wolves, dread wolves, worgs, vampiric wolves, and a wolfwere. A quick Fireball spell can make the fight much easier. You'll earn about 8000 xp for defeating the wolves.
|

|
| The plank with the compartment. |
7 - Hidden Compartment (X 210, Y 505)
At the base of the plank here, you can detect a small compartment containing ten
Darts of Wounding, five
Potions of Healing, a
Potion of Master Thievery, a
Potion of Storm Giant Strength, and a
Wand of Frost.
8 - Trapped Chest
Inside this chest you'll find ten
Darts +1, a
Wand of Magic Missiles, and 320 gp.
9 - Wolfwere Battle
When you enter Level 2 of Balduran's ship, you'll immediately get attacked by six wolfweres and a vampiric wolf. This battle is much tougher than the Level 1 fight (#6), so it's a good idea to rest and then buff up your party before starting it. You might also want to send your melee fighters up first, and then have your weaker characters come up when it's safe. You'll earn 11,600 xp for winning the fight.
10 - Locked Chest
Inside this chest you'll find (cursed) Bracers of Binding.
11 - Trapped Barrel
Inside this barrel you'll find an
Oil of Speed and a
Wand of Lightning.
12 - Locked and Trapped Chest
Inside this chest you'll find the silver dagger
Werebane and 423 gp.
13 - Wolfwere Battle
When you enter Level 3 of Balduran's ship, you'll immediately get attacked by four wolfweres and two vampiric wolves. This should be roughly as difficult as the battle on Level 2 (#9), and the same strategies should work. You'll earn 11,200 for winning the fight.
14 - Trapped Chest
Inside this chest you'll find five
Acid Arrows, a
Potion of Cloud Giant Strength, and three
Potions of Healing.
|

|
| The debris with the sack. |
15 - Hidden Sack (X 350, Y 495)
In the debris here, you can detect a hidden sack containing ten
Arrows +2 and ten
Bolts +2.
16 - Trapped Chest
Inside this chest you'll find two
Antidotes and a
Potion of Absorption.
17 - Karoug
When you enter Level 4 of Balduran's ship, you'll be confronted by Karoug. He'll sound offended that you've invaded his lair, and he'll try to recruit you to kill Kaishas. But no matter what you say to him, he'll attack you, and he'll have some friends with him: a mage named Daese (who will turn into a wolfwere when you attack her), and four wolfweres. Karoug will then turn into a greater wolfwere, one of the toughest opponents in the game.
This is a difficult battle, so you should take some time to prepare. First exit the ship so you can rest, and then go back inside and save next to the ladder leading to Level 4. Before heading up, have your casters buff your party (with at least Bless and Haste), and have your melee fighters quaff potions of giant strength (#7, #14). You might also want to ready some
Oils of Fiery Burning or
Potions of Fire Breath, if you have any around.
When the battle starts up, we'd recommend putting your best tank next to Karoug to block him while the rest of your party fights the wolfweres, concentrating first on Daese so you can convert her to a wolfwere before she casts anything nasty like Horror.
When you get to Karoug, realize that there are only four weapons in the game that can damage him:
Kondar (from the
Cloakwood Forest or
Baldur's Gate Southwest),
Flame Tongue (from
Durlag's Tower Lower Level 4),
Werebane (#12), and the
Sword of Balduran (which unfortunaetly is located behind Karoug at #19). Make sure your tank has one of these weapons, and spread out any others you have to your other melee fighters. Karoug can also be hit by wands and spells, but he's magic resistant.
To make the battle even more exciting, Karoug will regenerate his health, so you won't be able to nickel and dime him to death. You'll have to conentrate your entire party on him, and every bit of damage will help. So if you have characters without spells or special weapons, give them
Wands of Magic Missiles (#8) or
Oils of Fiery Burning or anything else you have available so they can help out.
Assuming everything goes well for you, you'll earn at least 16,900 xp for the battle, and you'll find a
Cloak of Protection +1, a
Knave's Robe, a
Shield Amulet, and the baby Peladan when you loot the corpses. You'll need Peladan for Maralee's quest in
Werewolf Island South.
18 - Locked and Trapped Chest
Inside this chest you'll find Dradeel's Spellbook, which you'll need for Dradeel's quest (#5).
19 - Desk
On this desk you'll find Balduran's Logbook, the Butter Knife of Balduran, and the
Sword of Balduran. You'll need the logbook for Mendas' quest in
Ulgoth's Beard.
20 - Kaishas' Ship
This is the ship that will allow you to leave the island, but you won't be able to reach it until you've completed Kaishas' quest in
Werewolf Island South.
Exits
- Entrance to Balduran's ship.
- Ladders connecting Levels 1 through 4 of Balduran's ship.
- Exit from the
Werewolf Warrens.